Wednesday, August 30, 2017

Spooky Cat Halloween Treat Bag and Witch's Hat

Hello sweet Peaches! I have something very special for you today! It's my very first 3-D items! For me, home decor items and 3-D items made from paper have always been intimidating. They always look so complicated and intricate. I'm a bit of a perfectionist, and if I'm completely honest with myself, the potential for failure is what's been stopping me from trying. But I conquered that fear of failure today, friends and I'm so glad I did because it was a lot more fun and simple than I'd imagined.


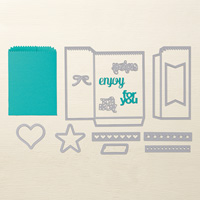
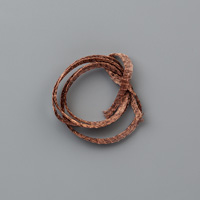
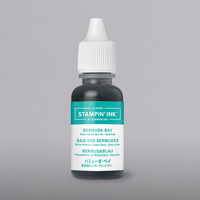
For my projects today, I used the brand new Spooky Cat stamp set which comes out this September, along with the Mini Treat Bag dies. If you take a closer look at the treat bag set, you'll notice it comes jam packed with all kinds of dies. There are even fun shape dies to add dimension and interest to your cute little bags. I plan to use it for my daughter's class to hold Halloween treats in. To create the bubbly potions, I took some watercolor paper and first stamped the bottles in Basic Black Archival ink and the added each color of liquid in Bermuda Bay, Berry Burst, and Lemon Lime Twist. The liquid parts of the potions are separate stamps which include some bubbles that, when stamped, bubble out of the tops of the bottles. I wanted to add more variation in the bubbles so I took the bubbles from the stamp set Mixed Drinks and stamped a few of those in the same colors. Then I took my aqua painter and colored over the potions to make the color run a little for a steamy, bubbly look. I also wanted to add some texture behind my die cut circles, so I took some Finely Woven Berry Burst ribbon and added some behind them. I also took some of that same ribbon and unraveled it. At first I only intended to use the thread that I pulled from the ribbon, but as I unraveled it, I thought the loose edges would be so pretty behind my circle pieces too. Here's a picture of how I pulled the thread to unravel the ribbon:


After I added my ribbon, I added a few more touches and details to finish off the treat bag and I was on to my which hat.

The witche's hat was actually inspired by a project kit that Stampin' Up! offered a while back. It's really quite simple. You can easily create this project in any size you like; just play around with your paper and experiment with different sizes.  I first cut out a circle out of Basic Black cardstock, using a small bowl from my kitchen as a stencil. Then I took a sheet of Basic Black cardstock and made a snow cone shape where it's curved at the top and cone shaped at the bottom, proportional to the base or brim of the hat. You may need to just test out different sizes until it looks like the right size. Then I rolled it so that the cone end came to a point which ends up being the top of the hat. Then I adhered the edges. Next I took a 1/2 inch strip of black paper and snipped up the center of the paper running horizontally so it creates a sort of fringe. I adhered the non fringed side to the inside of the bottom of the cone part of the hat and folded the fringed edges out and used those to adhere to the circle base part of the hat. After the basic structure of the hat was made, I crumpled the tip up a bit to add texture and age. Then I took some ribbon and sequin trim and wrapped it around the brim of the hat. Lastly, I stamped the rat from the Spooky Cat set and added it to one side. And that pretty much finishes my projects for today! Thanks so much for stopping by and I'll see you next post!


DON'T FORGET:
Use your Bonus Days coupons! For every $50 you spent July 1-31 (before shipping and tax), you will have received a $5 Bonus Days coupon via email that you can use NOW, August 1-31.  


To order online:
August 2017 Hostess Code:
3QTSD6RN


Check out the gorgeous new holiday stamp and die set Carols of Christmas! This is a very special pre-release. Now, during the month of August, you have early access to one of top bundles from the upcoming holiday catalog which doesn't release until September! Plus, this special early release comes during our Bonus Days promotion—which means if you earned Bonus Days coupons in July, then you can use them on Carols of Christmas in August!


The brand new holiday catalog is coming in September, so mark your calendars! It's packed full of beautiful and stunning products, gift ideas, and project samples, perfect to get your holidays off to a great start. For now I can only tease you with the cover of the catalog, but trust me, you are going to LOVE these great new products! Starting September 1st, you can see the whole catalog and order!


With so many amazing, beautiful  items provided for you, you'll be able to get your brand, new business off to a fast start-AND  spend your Starter Kit  dollars on things  like your favorite stamp sets and accessories, so there's no better time to join!  For just $99, you can select $125  of your choice of product AND  you'll be able to pre-order from the brand new Holiday Catalog as  earn a 20%  discount on your purchases from there Annual Catalog.  This is amazing deal! You  If you'd like to join my team, click here to sign up or email me @Craftylittlepeach@gmail.com


Monday, August 28, 2017

Magical Mermaid Birthday Party

Hi Peaches! What an eventful weekend!!! My little girl just turned 6 years old and she's absolutely crazy for mermaids. So guess what kind of party we planned-a mermaid pool party of course!! I made everything for her party from beautiful tranquil jellyfish lanterns to starfish magic wands. There were seashells and sand, coral and cake! We even had Ariel, the little mermaid, herself show up as a surprise for her. Ariel sang, painted the girls' nails and told them stories poolside. It was an unforgettable day, filled with magical memories for all. I've included pictures below of the spectacular event. For now, I wanted to share the birthday card I made for my little girl.

This card was inspired by another mermaid card I made a few posts back. I changed up a few things, mainly the colors. The theme colors of the party were aqua, light blue, and purple, so of course my mind goes to Stampin' Up! colors, lol. The obvious choices were Bermuda Bay, Tempting Turquoise, and Perfect Plum. The great thing about these colors when used to watercolor is that they blend beautifully and create much softer colors than when stamped directly on paper.

I took my watercolor paper and created a soft ombré watercolor wash, starting with Perfect Plum, then Tempting Turquoise, and lastly Bermuda Bay. I used the same colors on my mermaid's tail as well as on my greenery which I die cut using the Beautiful Bouquet dies. For the finishing touch, I added some  iridescent sequins and copper trim. I just love these colors together and since the card was created first, I was able to use it as inspiration for my daughter's party. I just love when it all works out like that! Thanks so much for stopping by and I'll see all of you next post!


DON'T FORGET:
Use your Bonus Days coupons! For every $50 you spent July 1-31 (before shipping and tax), you will have received a $5 Bonus Days coupon via email that you can use NOW, August 1-31.  

To order online: Stampin' Up! Webpage
August 2017 Hostess Code:
3QTSD6RN


Check out the gorgeous new holiday stamp and die set Carols of Christmas! This is a very special pre-release. Now, during the month of August, you have early access to one of top bundles from the upcoming holiday catalog which doesn't release until September! Plus, this special early release comes during our Bonus Days promotion—which means if you earned Bonus Days coupons in July, then you can use them on Carols of Christmas in August!


The brand new holiday catalog is coming in September, so mark your calendars! It's packed full of beautiful and stunning products, gift ideas, and project samples, perfect to get your holidays off to a great start. For now I can only tease you with the cover of the catalog, but trust me, you are going to LOVE these great new products! Starting September 1st, you can see the whole catalog and order!


With so many amazing, beautiful  items provided for you, you'll be able to get your brand, new business off to a fast start-AND  spend your Starter Kit  dollars on things  like your favorite stamp sets and accessories, so there's no better time to join!  For just $99, you can select $125  of your choice of product AND  you'll be able to pre-order from the brand new Holiday Catalog as  earn a 20%  discount on your purchases from there Annual Catalog.  This is amazing deal! You  If you'd like to join my team, click here to sign up or email me @Craftylittlepeach@gmail.com


Wednesday, August 23, 2017

Stampin' Up! Embossing With Dies Technique #GDP101

Happy Wednesday Peaches! I have a fun technique for you today, along with a brand new challenge from the Global Design Team. My technique today involves embossing using your Dies. What I love about this technique is that it opens up so many possibilities because you can use any Dies you have on hand to accomplish this look. I'll explain more about how this works after I introduce the weekly color challenge. Here's my card:


This week is a color challenge with the gorgeous combination of Night of Navy, Bermuda Bay, and Flirty Flamingo. I just adore these colors together, and from the looks of the samples made, along with the other submissions, there's no wrong way to combine them. Check out all the stunning projects by clicking here.

So to do this technique, you need to use this sandwich arrangement for your card panel: from the bottom, the Bigshot platform, then a cutting plate, next your silicone mat (these are super affordable and an invaluable tool for any crafter), then your card panel, and then your die of choice (today I'll be using the Window Box Thinlits die), and finally your top cutting plate on top. I've provided a picture below for visual reference.


After arranging this sandwich and running it through your Bigshot as you would any embossing folder, you should have a beautifully embossed image. What happens is that the silicone may provides cushion for the die to impress the image, while there is less pressure as you run it through so it won't actually cut the paper. I often forget about this technique and can't wait to find other dies to use with it.

To finish off my project, I took some of my craft white Ink Refill, squirted it onto my silicone craft mat (you could also use your clear blocks), added a few drops of Bermuda Bay refill, and mixed it. I did this so that my ink would be opaque and therefore show up on my bold Night of Navy background panel. I spattered it onto my panel by using my aqua painter to flick the drops of ink onto it. I also took some of the leftover mixed ink and painted the embossed image to create more contrast as I was afraid it would get lost in the background. I took a few strips of coordinating cardstock scraps (1/4 inch) and adhered them to a piece of scrap paper that I had traced a heart onto, using one of my heart dies. Then I took that very same heart die to cut out the striped heart. Finally, I added my sentiment and a few embellishments. I just love how stunning these colors are together, don't you?!

Well, that's my card for today! Thanks so much for stopping by! I'll see you all next post!


DON'T FORGET:
Use your Bonus Days coupons! For every $50 you spent July 1-31 (before shipping and tax), you will have received a $5 Bonus Days coupon via email that you can use NOW, August 1-31.  

To order online: Stampin' Up! Webpage
August 2017 Hostess Code:
3QTSD6RN


Check out the gorgeous new holiday stamp and die set Carols of Christmas! This is a very special pre-release. Now, during the month of August, you have early access to one of top bundles from the upcoming holiday catalog which doesn't release until September! Plus, this special early release comes during our Bonus Days promotion—which means if you earned Bonus Days coupons in July, then you can use them on Carols of Christmas in August!


The brand new holiday catalog is coming in September, so mark your calendars! It's packed full of beautiful and stunning products, gift ideas, and project samples, perfect to get your holidays off to a great start. For now I can only tease you with the cover of the catalog, but trust me, you are going to LOVE these great new products! Starting September 1st, you can see the whole catalog and order!


With so many amazing, beautiful  items provided for you, you'll be able to get your brand, new business off to a fast start-AND  spend your Starter Kit  dollars on things  like your favorite stamp sets and accessories, so there's no better time to join!  For just $99, you can select $125  of your choice of product AND  you'll be able to pre-order from the brand new Holiday Catalog as  earn a 20%  discount on your purchases from there Annual Catalog.  This is amazing deal! You  If you'd like to join my team, click here to sign up or email me @Craftylittlepeach@gmail.com


#TGIFC336 Color Challenge

   Hey peaches and thanks for joining me for another fun TGIF challenge this week! If you're new to the  TGIF Challen ges , each Friday,...