Wednesday, October 26, 2016

Crazy About You Sunshine Card

Hey Peaches, it's been pretty crazy around here the last couple of weeks as my family and I are planning our trip to Australia!!!!! With that in mind, I just couldn't help but sneak in one more card before my trip. I wanted to make this for the "sunshine" in my life. She has always been a great source of encouragement and love, and for that I have always thought of her as my sunshine.

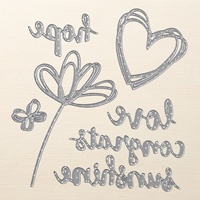
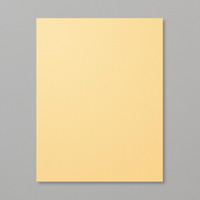
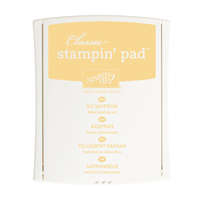
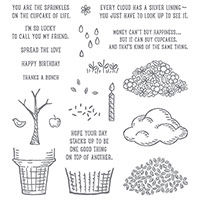
I wanted this card to be clean and simple for the most part. I, of course, started with the thick Whipser  White cardstock for my base, and then got all my elements ready for the top panel. I first took one of the stars from the Star Framlits Dies and cut 2 from some So Saffron cardstock and one from some vellum and layered them on top of each other, staggered, to create a sun shape. I love doing this because it gives me more versatility in the size for my sun. I also punched a circle out of Whiper White cardstock with my circle punch for the center of my sun. On the circle I stamped "miss you so much" (all from the Crazy About You stamp set) continuously until it covered the circle and then I inked the edges with So Saffron ink. 

Next, I cut some "clouds" from some Pool Party Designer Series Paper, using the Tree Builder punch. I then assembled them on top of my panel. After the clouds, I decided that I really wanted the "sunshine" part of my sentiment to stand out, so I used the "Sunshine" word die from Sunshine Wishes and cut it from So Saffron cardstock 3 times. I did this because when you stack them on top of each other, it's a great way to get instant dimension! Lastly, I stamped the rest of my sentiment in Basic Black ink and added a few sequins from a past Paper Pumpkin kit and some Wink of Stella to my sentiment and that finished off my card! Thanks so much for stopping by and as always, all supplies used for this card are listed below. You can just click on the links below and they will take you directly to the product! Thanks and see you next post!


check out my store:
Make sure you see my name in the upper right hand corner of the page or select "find a demonstrator", then "demonstrator directory" and search my name, Lauren Alarid. If you don't select me, I won't know who to thank for the order. Email me with any questions at Craftylittlepeach@gmail.com 
You can also check out my Pinterest Board:

Monday, October 10, 2016

Fall Watercolor Vintage Leaves

Hey Peaches! It's really starting to look a lot like fall around here. All the leaves are changing to gorgeous shades of warm colors. The beautiful scenery is my inspiration for today's card.

To start my card, I stamped the leaves in Versamark ink and added white embossing powder and heat set it. Then I used the lid of my ink pads (Real Red, Pumpkin Pie, Daffodil Delight) to watercolor with. I wanted to mix in some gold Wink of Stella into each ink color to create some gold accents/highlights. After letting them dry, I used the coordinating dies to cut the leaves out.

Next, I took some Whisper White cardstock and the sentiment "thanks a bunch" from the Sprinkles of Life stamp set to stamp repeatedly down the right side of my card panel in Versamark ink, added some copper embossing powder, and heat set it. I forgot to mention that I also cut out the largest maple leaf in Pumpkin Pie glimmer paper.

Before adding all my elements to the copper embossed panel, I took my gold Wink of Stella pen and flicked some gold specs on it. I did cut the word "thanks", from the Hello You thinlits dies out of copper foil paper and added all of my elements to my card panel. I took a piece of Crumb Cake cardstock and cut it to create a top folding base for my panel. I added some sequins and that finished off my card! Thanks so much for stopping by and as always, all supplies used for this card are listed below. You can just click on the links below and they will take you directly to the product! Thanks and see you next post!


check out my store:
Make sure you see my name in the upper right hand corner of the page or select "find a demonstrator", then "demonstrator directory" and search my name, Lauren Alarid. If you don't select me, I won't know who to thank for the order. Email me with any questions at Craftylittlepeach@gmail.com 
You can also check out my Pinterest Board:

Wednesday, October 5, 2016

Number of Years Watercolor Birthday card

Hey Peaches! Sorry it's been a while since my last post. I've been on vacation with my family, but we all know that's not going to keep me from my crafting for too long, haha! Anyway, for today's card I used a fun watercolor technique. Well, it wasn't so much of a technique as just me having fun, watercoloring.

To start, I wanted a unique looking background as my "canvas", so I took some watercolor paper and ran it through my Bigshot machine with the Petal Burst embossing folder, which is new from Stampin' Up! this year. After embossing it, I taped it down to a sturdy surface with some washi tape so that it wouldn't warp as I added water and ink. I squeezed some ink from three ink pads into the lid of the stamp pad so that I could use it to watercolor. I took my aqua painter and mixed (I used my E sized acrylic block as a pallet for mixing so I wouldn't contaminate the ink pads) together Elegant Eggplant and Rich Razzleberry. I took this mix and dabbed it in various places along my embossed paper. I did the same with my Tempting Turquoise until I was pleased with the variation.

While that dried, I cut out a number 3 and 1, using the Large Numbers framlits dies out of thick Whisper White cardstock and watercolored them both with the same colors. I also cut out a beautiful floral image from the Flourish Thinlits set out of vellum to add a delicate touch. I hear embossed the "happy" sentiment, from the Celebrate Today" stamp set, with white embossing powder and cut it to fit the bottoms portion of my card, and also added a banner cut at the end. I popped the numbers up with dimensionals, but you could always cut multiples of each number, and adhere them together to create dimension as well.

To finish off my card, I added a few clear sequins and some splatters from my Wink of Stella pen and that finished off my card! Thanks so much for stopping by and as always, all supplies used for this card are listed below. You can just click on the links below and they will take you directly to the product! Thanks and see you next post!


check out my store:
Make sure you see my name in the upper right hand corner of the page or select "find a demonstrator", then "demonstrator directory" and search my name, Lauren Alarid. If you don't select me, I won't know who to thank for the order. Email me with any questions at Craftylittlepeach@gmail.com 
You can also check out my Pinterest Board:

#TGIFC336 Color Challenge

   Hey peaches and thanks for joining me for another fun TGIF challenge this week! If you're new to the  TGIF Challen ges , each Friday,...