Showing posts with label Christmas Cards. Show all posts

Monday, November 13, 2017

Super Exciting News!!!! Plus Bonus Christmas Card

Okay guys, this may be a bit longer of a post than usual because I have so much to share! Today is the day that I can finally share with the world that I have been chosen to be a part of Stampin’ Up!’s elite 2018 Artisan Design Team! Ahhhhhhhh! I got the call back in September, asking me if I’d like to be a part of the team and of course I said yes! Well, I’m pretty sure there was a “yes” in there somewhere amidst the screaming, lol. If you’re wondering, “What/Who is/are the Artisan Design Team and what do they do?” Well, they are a very talented group of Stampin’ Up! demonstrators who create, blog about, and share inspiring projects. Additionally, I’ll be participating in a monthly blog hop with the design team, so keep an eye out for those starting in January. Each year Stampin’ Up! selects a handful (16 this year) of members from around the world and I’m so honored to be one of them!!! It’s an amazing opportunity and I’m so excited to be a part of it! I will include a list of the names of the other 15 members at the end.

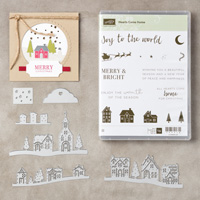
As a new member, I received an absolutely amazing welcome gift. It was a lovely white box, decorated in gorgeous SU product of course, and inside this beautiful box was a welcome letter, along with my own personalized stamp (eeeeeeeeeeh!!!) and a little blue box from Tiffany’s. This is actually my first blue box ever! Inside was a stunning charm bracelet with a heart charm that was engraved with the lovely Artisan Design Team logo. I’ve included pictures below.


 Now that I’ve shared my big news, I’ll move on to my card. I’m just going to go over one aspect of it as I’ve already made this post long enough, lol.

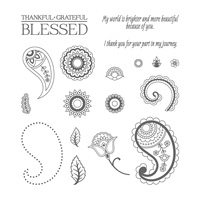
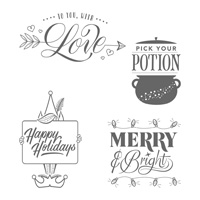
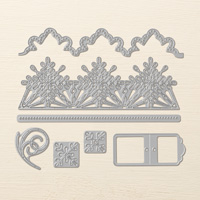
Have you ever thought, “Darn! If I only had some patterned paper in THAT color or pattern.” Well, I do this on occasion. Luckily, one of the things I love about Stampin’ Up! is that the products all are designed to coordinate effortlessly so it takes all the guess work out of crafting. However, some days I’m looking for something specific or that I might have run out of and that’s when I get the most creative. I have to come up with clever ways to get a look I’m going for. For example in today’s card, I wanted black paper with white polka dots, but I didn’t have any on hand. So...I just made my own! I took one of the round stamps from the Paisleys and Posies Stamp Set (pictured below) to make my polka dots. But I didn’t want the pattern to stamp, so I just flipped it over and stamped on its backside. Did you know you could do that? Now you’ve just doubled your stamp possibilities!


I inked it up in Versamark ink and stamped all over my Basic Black Cardstock until I was happy with the design. Then I added White Embossing Powder on top, heat set it, and voila, you have your very own polka dot patterned paper! Don’t forget to check out the backside of your stamps. The solid image they can create can give you a totally different look and add so much versatility to your projects.


I even got to try out my new personalized stamp! I LOVE it!


I’m so happy you stoped by and so excited for the upcoming year! Prepare to be inspired! See you next post!

Here’s the list of my fabulous fellow team members 
(In alphabetical order)

2018 Artisan Design Team:
Susan Wong

Get your friends together and host a party to earn Stampin' rewards during the month of September! Contact me to book an event!


To order online: 
November 2017 Hostess Code:
CPV3WPVY


 If you’ve considered joining, it's a truly great time! For just $99, you can select $125 of your choice of product AND earn a 20% discount on purchases from the Annual Catalog.  This is an amazing deal! If you want to join my team, click here or please email me!
Say hello to a new world of colorful creativity! Meet Stampin’ Blends, artist-quality alcohol markers in 12 exclusive Stampin’ Up! colors. To cover all the blending bases, we’re also offering a limited-time 16-card project kit and stamp set with beautiful line-art images.

Stampin’ Blends Product Features:

  • Add just the right amount of color where you need it with the brush tip or fine-point. 
  • Each color (except Ivory and Bronze) has a light and dark shade marker, available individually or in a combo pack. 
  • We have done in-house testing for evaporation and life testing and are really happy with the results, so you can feel confident sharing them with your customers. 
  • Press fit seal prevents air from entering the barrel and causing evaporation. 
  • The nestable lids are easy to keep track of and have a tight fit for long-lasting color.


Check out the video below to see these amazing markers in action:


Wednesday, November 1, 2017

Hearts Come Home Christmas Card

Happy Halloween to those that celebrate! Otherwise, happy Wednesday 😉! I have a quick post for you today featuring the beautiful Hearts Come Home bundle from Stampin’ Up!. This bundle has the most beautiful and intricate dies that cut out the most adorable little rows of houses, perfect for any snowy holiday scene. I added a little twist to my Christmas card today so let’s get started!

I wanted to create an interesting background without it taking over and outshining the main focus which is my little house scene. So I started with some Basic Gray cardstock and used my circles in varying sizes from my Stitched Shapes Framelits Dies to cut out circles. I chose the same color cardstock for my card base and began adhering them onto my base. I trimmed off any ends that overlapped the edges of my card base and my background was complete. I just love the texture and interest this background adds to my card!

Next, I cut out a row of houses in Pool Party cardstock and then a different row in Soft Sky cardstock. I then die cut another circle (the largest stitched circle) in Whisper White cardstock. I layered my rows of houses onto the circle I just cut and then replaced the largest stitched circle over Whisper White circle with the houses, making sure to line the stitches up on the die with the die cut circle and send it through my Bigshot. This will cut the edges off of the rows of houses that we just layered on our circle so that they fit perfectly on our circle. I also added a scalloped circle in Dapper Denim to layer behind the circle.

Lastly I hear embossed my sentiment in white embossing powder onto black cardstock and added a piece of Dapper Denim Striped Grosgrain Ribbon behind my sentiment. Lastly I added some Wink of Stella to the houses and that finished off my card. Thanks so much for stopping by and I’ll see you next post!


I’ve included this picture below showing how beautiful the glitter effect is from the Wink of Stella added to the houses.


Get your friends together and host a party to earn Stampin' rewards during the month of September! Contact me to book an event!


To order online: 
November 2017 Hostess Code:
CPV3WPVY


 If you’ve considered joining, it's a truly great time! For just $99, you can select $125 of your choice of product AND earn a 20% discount on purchases from the Annual Catalog.  This is an amazing deal! If you want to join my team, click here or please email me!
Say hello to a new world of colorful creativity! Meet Stampin’ Blends, artist-quality alcohol markers in 12 exclusive Stampin’ Up! colors. To cover all the blending bases, we’re also offering a limited-time 16-card project kit and stamp set with beautiful line-art images.

Stampin’ Blends Product Features:

  • Add just the right amount of color where you need it with the brush tip or fine-point. 
  • Each color (except Ivory and Bronze) has a light and dark shade marker, available individually or in a combo pack. 
  • We have done in-house testing for evaporation and life testing and are really happy with the results, so you can feel confident sharing them with your customers. 
  • Press fit seal prevents air from entering the barrel and causing evaporation. 
  • The nestable lids are easy to keep track of and have a tight fit for long-lasting color.


Check out the video below to see these amazing markers in action:


Wednesday, October 25, 2017

Festive Phrases Detailed Edge Christmas Card

Hello Peaches! I hope you’re have a great week! I have a unique card for you today. In Stampin’ Up!’s new holiday catalog there are some really beautiful dies called Swirly Snowflakes that have an edglit die that creates a stunningly detailed snowflake edge. I have used this for to create snowflakes for some other cards because the die actually has three beautiful snowflakes in a lined pattern, but this time I wanted to use it as intended. However, I wanted to make my card a little different. I wanted it to really feature the snowflake edgelit, so I made the edge shorter than the back fold of the card.

I started by die cutting the main front panel with the snowflake edgelit on the right side. Now since I’m using Thick Whisper White as my base and this die is so detailed, I recommend using the Precision Base Plate with your Bigshot. After running the detailed snowflake edgelit and my card front through, I took a 5 1/4” x 4” piece of Real Red cardstock and ran it through my Bigshot with the other coordinating edgelit die in the set. These two dies are designed to layer together and that’s how you’ll see me use them on my card today.

After cutting my Real Red piece I was ready to layer it behind my snowflake edge. To do this I lined both edges up so that the red was underneath the white snowflakes and the other end of the red piece was lined up with the inside fold of my card so that when you open the card it would have a full panel of Real Red on the inside. I also took a piece of Real Red ribbon and tied it laterally along the edge for added detail.

For my sentiment, I took the one that says “Special Delivery From the North Pole” and heat embossed it with White Embossing Powder and fussy cut it out. I also added a star from the Star of Light dies for added dimension and interest. I added a few more details and that finished off my card! Thanks so much for stopping by and I’ll see you next post!


Get your friends together and host a party to earn Stampin' rewards during the month of September! Contact me to book an event!


To order online: 
October 2017 Hostess Code:
CS39KU6H


 If you’ve considered joining, it's a truly great time! For just $99, you can select $125 of your choice of product AND earn a 20% discount on purchases from the Annual Catalog.  This is an amazing deal! If you want to join my team, click here or please email me!

Say Hello to the Merry Patterns Host Promotion!


What could make hosting a holiday catalog event more fun? How about the chance to earn a FREE, exclusive stamp set? We’re calling it the Merry Patterns Host Promotion—and anyone can join in the fun. Here's how it works: if you host a party with $300 USD/$375 CAD in sales by October 31, you'll earn the Merry Patterns Stamp Set for FREE. The Merry Patterns Stamp Set is exclusive to this host promotion and will not be available after the last day of October, so grab it while you have the chance! There's also a great video with gorgeous samples to help you get a head start on making beautiful Christmas cards and projects with your “merry” new set. Check out the video below:


Let's admit it: we all just love gorgeous Designer Series Paper. So we're confident that you're going to love this news: During October, but 3 packages of select Designer Seriers Paper and get one FREE! There is no limit to how many free packages you can earn during the sale. This means now is a great time to save on some of our most popular paper designs. Check out the great selection below:


#TGIFC336 Color Challenge

   Hey peaches and thanks for joining me for another fun TGIF challenge this week! If you're new to the  TGIF Challen ges , each Friday,...