Monday, October 30, 2017

Text Ya Later Shaker Card

Hello Sweet Peaches! Happy Monday! I have a really fun interactive card for you today. I have made a few shaker cards in the past and I wanted to share a few helpful tips for those of you attempting them for the first time or those who might like to hear what has worked well for me. Shaker cards can be fairly simple once you give them a try. You may even find yourself a bit addicted, lol.

For today’s card I’m actually CASE-ing (copy and selectively edit) the annual catty. I thought the simple layout would work nicely for my shaker card. I started with a Bermuda Bay cardstock base and then began working on my main shaker portion of the card. To create a shaker, you need a piece of acetate. I love using Stampin’ Up!’s Window Sheets. They are very high quality and work well for this. I wanted to “text screen” to be stamped directly onto the acetate so that you could see all the fun bits shaking about behind the screen. Unfortunately, when you stamp onto acetate it can take forever to dry so you risk smudging your image. To avoid this (and partially because I’m impatient, lol) I first stamped in Basic Black ink and then added clear embossing powder directly over the image. I should mention that it is critical that you use your Embossing Buddy on your acetate first. This powder will help prevent extra embossing powder from sticking to places you don’t want it to.

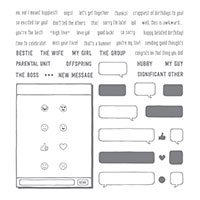
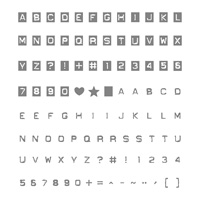
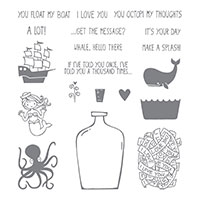
After I heat set the embossing powder I went on to stamping my text conversation bubbles. These come from the “Text Ya Later” Stamp set. This set is super cute and jam packed with playful sentiments and amusing quips. I wanted to recreate a typical text conversation with my hubby as I had planned to sneak this card into his work bag. So I took a few sentiments from the set and added a few of my own, using the “Labeler Alphabet” set. I stamped a few conversation bubbles and then added the text. I also HAD to stamp the adorable “love eyed” emoticon. He’s just so cute! After that, I cut them out and adhered them to my text box on my acetate. Now I was ready to create my shaker.

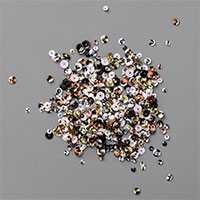
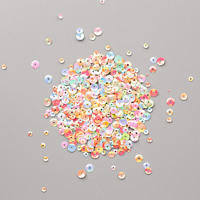
In order to have space for my shaker pieces to move, I really love to use the Foam Adhesive Strips. They’re really easy to work with and can be bent and manipulated to fit any shape. However I didn’t want them to show through the acetate so I cut a piece of Bermuda Bay cardstock to be just a quarter size longer and wider than my stamped acetate text box and the cut the center of the cardstock out to create a frame that was almost a quarter inch wide (wide enough to cover my foam strips) and adhered it to the outer edge of my acetate. Then I flipped my acetate over and added foam all around the border. The key is to make sure there are no gaps and that your foam corners all touch. I also like to take my Embossing Buddy and run it along the inside of this side of acetate as well. This will help keep your shaker bits from sticking to the sides. Then I took a few hearts and metallic sequins and added them to the “well” I just created with the foam on my acetate sheet. While my shaker was still flipped over, I took a piece of Whisper White cardstock cut to be just 1/8” bigger than my original acetate text box and adhered it to the foam on the backside of my shaker. Now you should be able pick up your shaker and shake it.

To finish it off, I just took my shaker and added it to a few layers of cardstock and then onto my Bermuda Bay cardstock base. And that finishes off my card for today. Thanks so much for stopping by and I’ll see you next post!


Get your friends together and host a party to earn Stampin' rewards during the month of September! Contact me to book an event!


To order online: 
October 2017 Hostess Code:
CS39KU6H


 If you’ve considered joining, it's a truly great time! For just $99, you can select $125 of your choice of product AND earn a 20% discount on purchases from the Annual Catalog.  This is an amazing deal! If you want to join my team, click here or please email me!

Say Hello to the Merry Patterns Host Promotion!


What could make hosting a holiday catalog event more fun? How about the chance to earn a FREE, exclusive stamp set? We’re calling it the Merry Patterns Host Promotion—and anyone can join in the fun. Here's how it works: if you host a party with $300 USD/$375 CAD in sales by October 31, you'll earn the Merry Patterns Stamp Set for FREE. The Merry Patterns Stamp Set is exclusive to this host promotion and will not be available after the last day of October, so grab it while you have the chance! There's also a great video with gorgeous samples to help you get a head start on making beautiful Christmas cards and projects with your “merry” new set. Check out the video below:


Let's admit it: we all just love gorgeous Designer Series Paper. So we're confident that you're going to love this news: During October, but 3 packages of select Designer Seriers Paper and get one FREE! There is no limit to how many free packages you can earn during the sale. This means now is a great time to save on some of our most popular paper designs. Check out the great selection below:


Wednesday, October 25, 2017

Festive Phrases Detailed Edge Christmas Card

Hello Peaches! I hope you’re have a great week! I have a unique card for you today. In Stampin’ Up!’s new holiday catalog there are some really beautiful dies called Swirly Snowflakes that have an edglit die that creates a stunningly detailed snowflake edge. I have used this for to create snowflakes for some other cards because the die actually has three beautiful snowflakes in a lined pattern, but this time I wanted to use it as intended. However, I wanted to make my card a little different. I wanted it to really feature the snowflake edgelit, so I made the edge shorter than the back fold of the card.

I started by die cutting the main front panel with the snowflake edgelit on the right side. Now since I’m using Thick Whisper White as my base and this die is so detailed, I recommend using the Precision Base Plate with your Bigshot. After running the detailed snowflake edgelit and my card front through, I took a 5 1/4” x 4” piece of Real Red cardstock and ran it through my Bigshot with the other coordinating edgelit die in the set. These two dies are designed to layer together and that’s how you’ll see me use them on my card today.

After cutting my Real Red piece I was ready to layer it behind my snowflake edge. To do this I lined both edges up so that the red was underneath the white snowflakes and the other end of the red piece was lined up with the inside fold of my card so that when you open the card it would have a full panel of Real Red on the inside. I also took a piece of Real Red ribbon and tied it laterally along the edge for added detail.

For my sentiment, I took the one that says “Special Delivery From the North Pole” and heat embossed it with White Embossing Powder and fussy cut it out. I also added a star from the Star of Light dies for added dimension and interest. I added a few more details and that finished off my card! Thanks so much for stopping by and I’ll see you next post!


Get your friends together and host a party to earn Stampin' rewards during the month of September! Contact me to book an event!


To order online: 
October 2017 Hostess Code:
CS39KU6H


 If you’ve considered joining, it's a truly great time! For just $99, you can select $125 of your choice of product AND earn a 20% discount on purchases from the Annual Catalog.  This is an amazing deal! If you want to join my team, click here or please email me!

Say Hello to the Merry Patterns Host Promotion!


What could make hosting a holiday catalog event more fun? How about the chance to earn a FREE, exclusive stamp set? We’re calling it the Merry Patterns Host Promotion—and anyone can join in the fun. Here's how it works: if you host a party with $300 USD/$375 CAD in sales by October 31, you'll earn the Merry Patterns Stamp Set for FREE. The Merry Patterns Stamp Set is exclusive to this host promotion and will not be available after the last day of October, so grab it while you have the chance! There's also a great video with gorgeous samples to help you get a head start on making beautiful Christmas cards and projects with your “merry” new set. Check out the video below:


Let's admit it: we all just love gorgeous Designer Series Paper. So we're confident that you're going to love this news: During October, but 3 packages of select Designer Seriers Paper and get one FREE! There is no limit to how many free packages you can earn during the sale. This means now is a great time to save on some of our most popular paper designs. Check out the great selection below:


Monday, October 23, 2017

Message in a Bottle Ombré Stamping Technique

Hello Sweet Peaches! How was your weekend?! I’ve had sure a wonderfully relaxing weekend. The past few weeks have been non-stop go, go, go, so it was nice to have a few days to just enjoy some down time. Of course I got some crafting in! I had taught a 2nd grade class some simple watercoloring techniques last week so I was in the mood to watercolor. I began with a watercolor wash for the background of my card, but ended up integrating another technique into my card that I thought you’d enjoy.


Many of you may have heard of or tried ombré stamping before. It’s not a new technique by any means, but if you’re new to stamping, you may not have seen/tried it before, so I thought I’d explain how I achieve the look in my stamping.

First, I like to choose two colors that compliment each other well. Sometimes they are of a similar hue and sometimes they are different but look so pretty together. You will just have to try out different combinations to see what you like. I ended up using Bermuda Bay for my lighter color and Pacific Point for my dark. I was, after all, stamping an octopus so I wanted him to be a beautiful bright blue. The key is to start with the lighter color which in this case was Bermuda Bay. I ink up my entire stamp in Bermuda Bay and the dab my Sponge Dauber in the Pacific Point ink. I then dab on the darker ink onto the top half of my stampand work my way towards the middle. I add another dab of the Pacific Point to the top most part of the octopus to deepen the color on that end and then “huff” on the freshly inked stamp to remoisten the ink and stamp it. What you should end up with is a lovely gradient of color starting with a lighter color that goes into a darker at the other end.

I just love the outcome of this technique! I have used it on larger sentiments as well and it looks pretty awesome too. You will have more success and effect on larger images/stamps as you will have a larger surface area to get the gradient look. Like I said before, you’ll just have to experiment with different stamps and colors to find what works best.

Did you notice the bubbles in the background? I just used my Wink of Stella pen to add glittery bubbles. I just love the soft results.

Y


Well, that’s my card for today! Thanks so much for stopping by and I’ll see you next post!


Get your friends together and host a party to earn Stampin' rewards during the month of September! Contact me to book an event!


To order online: 
October 2017 Hostess Code:
CS39KU6H


 If you’ve considered joining, it's a truly great time! For just $99, you can select $125 of your choice of product AND earn a 20% discount on your purchases from the Annual Catalog.  This is an amazing deal! If you want to join my team, click here or please email me!

Say Hello to the Merry Patterns Host Promotion!


What could make hosting a holiday catalog event more fun? How about the chance to earn a FREE, exclusive stamp set? We’re calling it the Merry Patterns Host Promotion—and anyone can join in the fun. Here's how it works: if you host a party with $300 USD/$375 CAD in sales by October 31, you'll earn the Merry Patterns Stamp Set for FREE. The Merry Patterns Stamp Set is exclusive to this host promotion and will not be available after the last day of October, so grab it while you have the chance! There's also a great video with gorgeous samples to help you get a head start on making beautiful Christmas cards and projects with your “merry” new set. Check out the video below:


Let's admit it: we all just love gorgeous Designer Series Paper. So we're confident that you're going to love this news: During October, but 3 packages of select Designer Seriers Paper and get one FREE! There is no limit to how many free packages you can earn during the sale. This means now is a great time to save on some of our most popular paper designs. Check out the great selection below:


#TGIFC336 Color Challenge

   Hey peaches and thanks for joining me for another fun TGIF challenge this week! If you're new to the  TGIF Challen ges , each Friday,...