
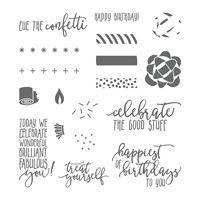
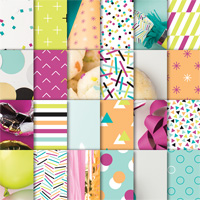
Today, I will be showcasing the Picture Perfect Birthday Stamp Set and Picture Perfect Party Designer Series Paper (DSP) from the Picture Perfect Party Suite of products. I just love how these fun products can add pop to any celebration. As you can see in my projects below, there are so many possibilities.

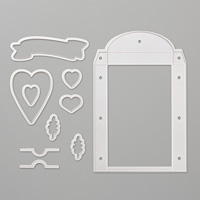
For today's projects, I created a gift box and matching card. For the gift box, I used the Lots To Love Box Framelits Dies to cut out my box from some Whisper White Cardstock. Next, I took a piece of Vellum Cardstock and used one of the stamps from the set to stamp repeatedly in Versamark Ink. I added some Silver Embossing Powder to the stamped images and heat set them to create the party-style bottom layer of my "belly band". For the next layer, I took some Lemon Lime Cardstock, folded it lengthwise and snipped tiny slits almost all the way through to create a fringed look. I also added a thinner layer of light green glimmer paper from the Myths & Magic Glimmer Paper to the center of the fringed lime cardstock. For the party sticks, I simply stamped the first layer of the bow stamp in Lemon Lime Twist Ink and then used my Sponge Dauber to add some Bermuda Bay Ink to the bottom half for an ombré look. I stamped off one before stamping my intended image for a softer effect. For the second step of this stamp, I stamped the same colors in full strength. I did the same for the other bow, except I reversed the colors. I stamped the frilly fringed image twice, one in Bermuda Bay and one in Lemon Lime Twist and added them to the base of my bows. I added one bow to the top of some wooden dowels, along with a piece of Silver Mini Sequin Trim. I used my Sponge Dauber to ink up some Whisper White Baker's Twine in each color and added them to my sticks. I stamped my "Happy Birthday" sentiment and added it to the top of my bows and added them to my gift box. To finish off my box, I added a few sequins from the Iridescent Sequin Assortment and that finished off my box.


This suite of products was so fun and inspiring that I created a few other projects using the colors that coordinated with this suite. I will include them below. I hope you have enjoyed all of today's cards and designs. Keep hopping along and check out my other fellow teammates’ pages. They have some pretty amazing projects to share. I’ve listed them, along with all products used below or you can just click the link below to hop to Linda Van Wely-Zwolle.


Don't forget: Stampin' Up! features a corporate blog post each Thursday of the month where we Artisans share creative tips, tricks, and strategies. You can find these posts in the "notes" section of the Stampin' Up! Facebook Page.Thanks so much for stopping by and I’ll see you next post!

2018 Artisan Design Team
Sale-A-Bration


Sale-A-Bration is one of Stampin' Up!'s biggest sales of the year! Through March 31st, for every $50 USD/$60 CAD you spend, you’ll receive a free Sale-A-Bration product. For anyone who has enjoyed Sale-A-Bration in the past, we have an exciting new announcement for this year: We now have a new reward level, giving you more flexibility and options for your free items.

Let’s break it down:

- If you spend $50, you get one free level 1 product.
- If you spend $100, you get one free level 2 product, OR, you can choose two level 1 items.
- If you spend $150, you have the option to choose three level 1 items or one level 1 item and one level 2 item.
This new option allows everyone to create a personalized Sale-A-Bration experience! Contact me for more info!


Host A Party
Get your friends together and host a party to earn Stampin' rewards during the month of September! Contact me to book an event!
To order online:
March 2018 Hostess Code:
KM43QW4X
Or email me @ Craftylittlepeach@gmail.com
If you’ve considered joining, it's a truly great time! For just $99, you can select $125 of your choice of product AND earn a 20% discount on purchases from the Annual Catalog. This is an amazing deal! If you want to join my team, click here or please email me!
Supplies:


I am a sucker for a wand. Love yours on your cards! Look at you with all your projects! you are a busy bee!
ReplyDeleteMe too, Cathy, lol! Wanda are so fun! 😘
DeleteOh my goodness what a selection of projects - all just gorgeous! Love all the layers and embellishments on each one of them!
ReplyDeleteThanks, Emma! They were so fun that I just couldn’t stop creating!
DeleteWOWZA! Your use of color amazes me once again. Hard to pick a favorite detail but that fringe is the BOMB. Beautiful job Lauren.
ReplyDeleteAwe, thanks, love! You know I love my bright colors, lol!
DeleteI just LOVE all of these. Your colour choices and all those layered details are so perfect.
ReplyDeleteThanks so much, Jennifer! I just HAVE to have layers it seems, haha.
DeleteAmazing work Lauren. Am definitely going to use your tip to achieve the fringed cardstock.
ReplyDeleteThank you so much! Yes! It’s super easy and creates such a fun look!
DeleteHow cool to create wands with this set, love it!! Again, love all your details, haha, these are all gorgeous!
ReplyDeleteThanks so much, lovely! It was so much fun!
DeleteBeautiful selection of amazing cards, Lauren!
ReplyDeleteI love all!
Thanks so much, sweet stuff! I loved your box as well! 😉😘
DeleteLauren, I love that you created your own fringed paper ribbon for your projects. I also love the beautiful color combos you used!
ReplyDeleteThank you Connie! I guess I just got so excited about the fringed ribbon that was discontinued and had to make my own, lol
DeleteOh what an amazing idea with that fringe fussy cutting for the ribbon. I love your soft touch as well as the bold colours. They mesh so well together. Beautiful! xo
ReplyDeleteThanks so much, Kim! I’m a sucker for those fun bright colors! This was such a fun suite to work with. 😊
DeleteLove your creations Lauren, as always. That ribbon is beautiful.x
ReplyDeleteThank you, love! 😊😘
DeleteThese are beautiful Lauren, so much fun & so much texture. I LOVE the colours, but you probably would have already guessed that!
ReplyDeleteGORGEOUS!
Haha, yep, I knew that! Thanks, gorgeous! 😊😘
Delete