
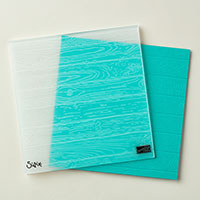
Before I start diving into fall projects again (and believe me, they're coming 😉), I wanted to bring you a bright playful card that features many different textures, along with some ombré mixed in. I find that having multiple types of texture can add so much interest and dimension to a card or project. Your eye just gravitates to these areas. I especially love doing tone on tone when adding texture for a beautifully subtle background like I did with the gorgeous Pinewood Planks Dynamic Textured embossing folder. I used Pool Party cardstock for both the base and first layer.
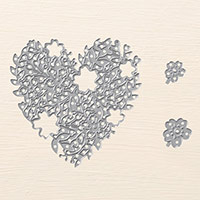
The next textured element is the heart. I took a piece of Whisper White cardstock and a sponge and inked on some Bermuda Bay ink. The key to an ombré look is a light hand when inking. After inking the sponge (lightly), I first dab off a bit on some scrap paper so that there aren't any harsh lines created from the natural shape of the sponge. Always start from the bottom and ink upwards so that the ink gradually gets lighter as you move up. Keep inking this way until you're happy with the color. This doesn't have to be perfect since I planned to die cut it out with the Bloomin' Heart die.
After I die cut the heart, I adhered it to my card base. Then I added the other elements to finish it off. The doily, twine, and small hearts add even more texture. As you can see, you can add as much or as little of these elements to add the dimension and interest you prefer. There are so many possibilities! Give it a try! Well, that's my card for today! Thanks for stopping by! See you next post!


Get your friends together and host a party to earn Stampin' rewards during the month of September! Contact me to book an event!

To order online:
September 2017 Hostess Code:
XS6WHQQW
Or email me @ Craftylittlepeach@gmail.com
If you’ve considered joining, it's a truly great time! For just $99, you can select $125 of your choice of product AND earn a 20% discount on your purchases from the Annual Catalog. This is an amazing deal! If you want to join my team, click here or please email me!
Say Hello to the Merry Patterns Host Promotion!


What could make hosting a holiday catalog event more fun? How about the chance to earn a FREE, exclusive stamp set? We’re calling it the Merry Patterns Host Promotion—and anyone can join in the fun. Here's how it works: if you host a party with $300 USD/$375 CAD in sales by October 31, you'll earn the Merry Patterns Stamp Set for FREE. The Merry Patterns Stamp Set is exclusive to this host promotion and will not be available after the last day of October, so grab it while you have the chance! There's also a great video with gorgeous samples to help you get a head start on making beautiful Christmas cards and projects with your “merry” new set. Check out the video below:


No comments:
Post a Comment
Note: Only a member of this blog may post a comment.