
“Meant To Be” Versatile
Hello, everyone! My name is
Lauren Alarid. I’m a Stampin’ Up! demonstrator in California and 2019 Artisan
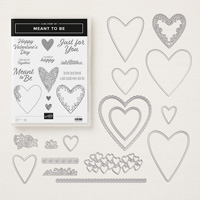
Design Team member, and I am so happy to be sharing my creativity on the Stampin' Up! Company Blog. Today I wanted to share with you how I stretched the Meant To BeBundle beyond it’s more obvious use and show you how versatile it
really is.

I love heart dies and
stamps! They can be so great for making Valentine’s Day cards/gifts, love
notes, or even wedding invitations, but what’s truly special about this bundle,
and more specifically it’s dies, is that they can be used for so much more than
Valentine’s Day. In today’s project, I have used them to highlight the way I
look back on and remember a special moment together with my husband. They were
the perfect touch for the look I was going for, a cascade of love.
I used both the stamp set and the dies to create dozens of hearts for my “waterfall” of
hearts. I stamped some in Versamark Ink and embossed them in GoldEmbossing Powder onto Vellum and for the rest, I die cut them
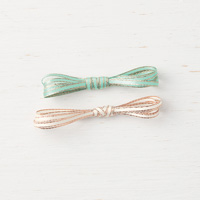
from Whisper White Cardstock. I used Whisper White Baker’s Twine to ground my falling hearts. I just adore the bunch of tiny hearts that die cut
together! I used that cut to put behind my page title.

After placing all of my
hearts, I wanted to add a little extra dimension and texture to my “waterfall”
of hearts and those sweet little Heart Epoxy Droplets just seemed so
perfect. However when I placed them on my page, they didn’t stand out against
the all of the lovely gold as much as I had hoped, so I improvised. I made them
all gold and if you would like gold heart epoxy droplets, it’s super easy! Here
are the simple steps:
- Cut a strip off of the epoxy hearts that you would like to emboss (I chose to cut away a strip of hearts so that I wouldn’t get the rest of the hearts embossed in gold.
- Press the strip (epoxy heart side facing down) into your Versamark Ink Pad, making sure to get all hearts covered in ink.
- Use tweezers to hold the strip and pour your Gold Embossing Powder over the epoxy heart shapes.
- Use your Heat Tool to melt the powder and you will be left with gold epoxy heart droplets.


Here’s a closer look at
those pretty, little hearts in action (picture below).

I hope that you have enjoyed
this unique alternative for using the gorgeous heart dies! I’m sure you’ll find
many more fabulous ways to use them, even after Valentine’s Day has passed.
They are without a doubt a “must have” for any crafter, and now you can see how
these products were “Meant To Be” versatile.
Happy Crafting!
Lauren Alarid
2018 Artisan Design Team
Thanks so much for stopping by and I'll see you next post!
Don't forget! You can find me on Instagram and Facebook! Happy stamping!Use my host code (ZUCKAQZ9) for monthly bonus items. Contact me for more info: Craftylittlepeach@gmail.com
Sale-a-Bration
You can earn a FREE product every time you reach a threshold! For example, if you spend $150 USD, you can then choose 3 level 1’s or 1 level 1 and 1 level 2. This gives you more flexibility to choose what you want. Below are the markets and their qualifying levels.
MARKET LEVEL 1 LEVEL 2
US
$50
$100
CA
$60
$120
Host A Party
Get your friends together and host a party to earn Stampin' rewards during the month of January! Contact me to book an event!
To order online:
January 2019 Hostess Code:
ZUCKAQZ9
Or email me @ Craftylittlepeach@gmail.com
You can earn a FREE product every time you reach a threshold! For example, if you spend $150 USD, you can then choose 3 level 1’s or 1 level 1 and 1 level 2. This gives you more flexibility to choose what you want. Below are the markets and their qualifying levels.
| MARKET | LEVEL 1 | LEVEL 2 |
US
|
$50
|
$100
|
CA
|
$60
|
$120
|
Host A Party
ZUCKAQZ9
Starting January 3, hosts with qualifying orders can receive additional Stampin’ Rewards. Below are the markets, qualifying amounts, and additional Stampin’ Rewards they can receive.


If you’ve considered joining, it's a truly great time! For just $99, you can select $125 of your choice of product AND earn a 20% discount on purchases from the Annual Catalog. This is an amazing deal! If you want to join my team, click here or please email me!

Supplies:


No comments:
Post a Comment
Note: Only a member of this blog may post a comment.