Thursday, September 27, 2018

Oh So Eclectic - Lunchbox Notes


Oh So Eclectic Lunchbox Notes

Hello, everyone! My name is Lauren Alarid. I’m a Stampin’ Up! demonstrator in California and 2018 Artisan Design Team member, and I am so happy to be sharing my creativity on the company blog. Today I wanted to share with you how I designed and created these sweet little lunchbox notes to give to put in my daughter’s lunch. It’s the perfect way to add a smile to her day!


Whether it’s your child’s lunchbox or your spouse’s lunch sack, a little note to say that you love them or that you hope they have a great day can have such a positive effect. I love that it also shows my daughter a positive example of sharing kindness with others. That’s why I love to add a little handmade kindness to her day. They are so fun to make and fit easily into a lunchbox or bag.


When coming up with designs for my tiny notecards I often take inspiration from previous designs that I have made or even the catalog. I just take the original design and tweak it a 
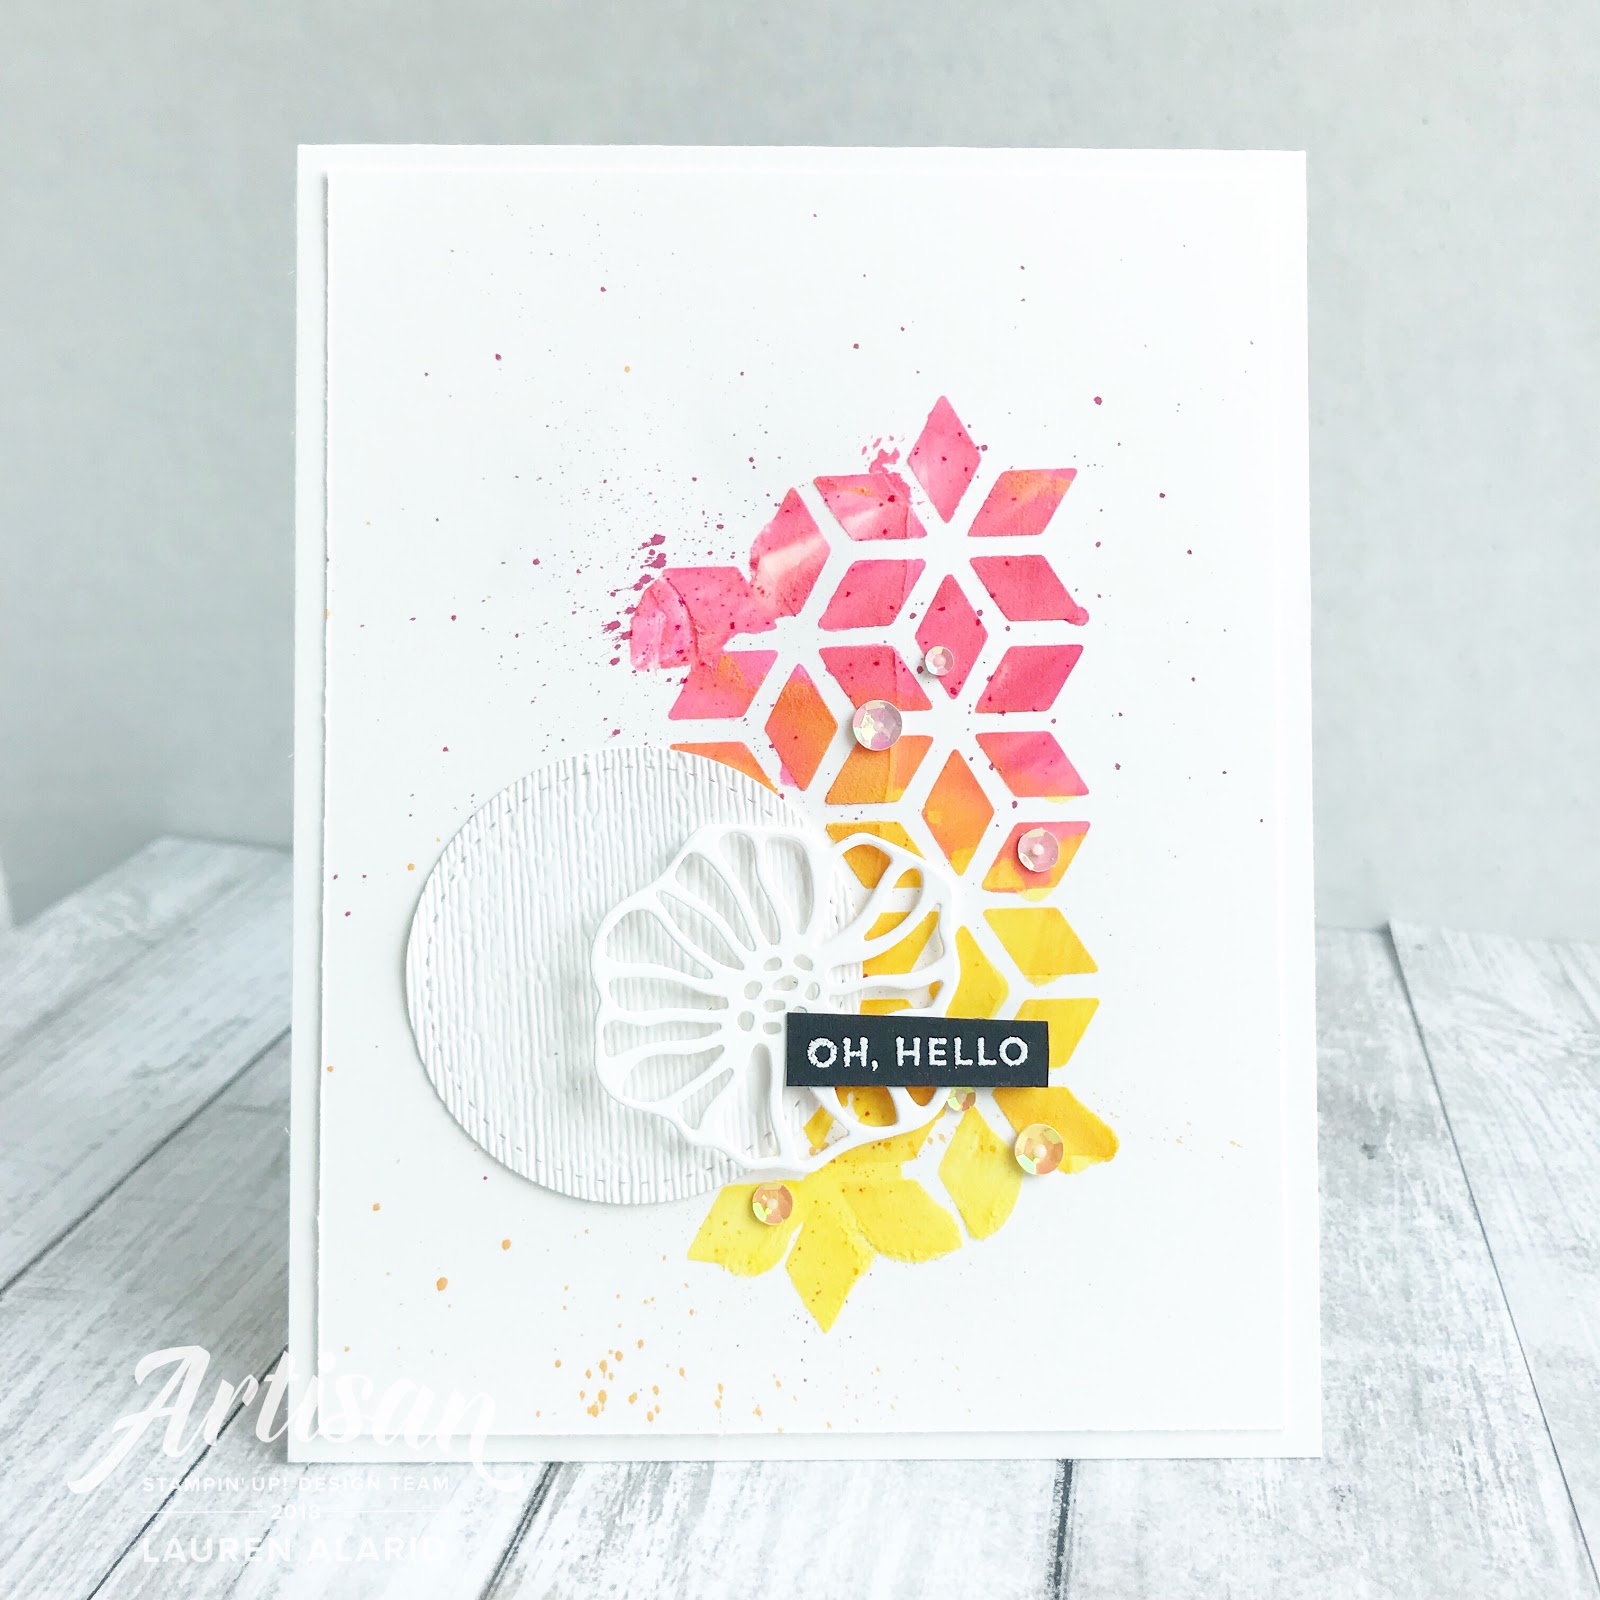
bit to fit on a smaller scale. For today’s lunchbox notes, I CASEd (copy and selectively edit) one of my own designs (pictured above). I love the bright happy colors of this card and the Oh So Eclectic Stamp Set paired with the Eclectic Layers Thinlits Dies offered the perfect combination of sentiments and images for the look I was going for.


For my first two cards, I began with a piece of Watercolor Paper to create my floral images. I inked up the two different floral images in the set in Pineapple Punch Ink and then used my Sponge Dauber to add Melon Mambo Ink to parts of the floral images before stamping them onto my Watercolor Paper. I used my Aqua Painter to blend where the two colors met to create an ombre effect.

Next, I used the coordinating dies to cut both floral images out. I did the same ink blending with my Aqua Painter for the floral layer on top of each flower and set them aside to dry and die cut them later.

After that, I created the textured background for my trio of cards. I love the variety of dies in this set. There are regular dies, embossing dies, and dies that make only negative cuts. This adds so many possibilities and versatility to my cards. I actually used the negative-cutting die to emboss one of my backgrounds! Here are the simple steps:
  1. Choose your dies to emboss with
  2. Take your Thick Whisper White Cardstock and arrange your dies
  3. Arrange you embossing sandwich (from bottom to top): Big Shot Platform, Standard Cutting Pad, Die (cutting edge up), cardstock/paper, Big Shot Embossing Mat, Impressions Pad
  4. Run through your Big Shot Machine


After I did this for all three cards, I added my stamped/watercolored flowers to the first two cards. For the last card, I added an embossed floral image. I wanted the floral image to have some color, so I added the same two colors with my Sponge Dauber, applying color lightly and gradually.


To finish off my cards I added some Basic Black Baker’s Twine and both Metallic Sequins and Iridescent Sequins.
I hope that you have enjoyed these fun little lunchbox notes! I encourage you to try to make a few tiny notes to stick in someone special’s lunch or bag. Just a tiny bit of kindness goes a long way and can bring so much sunshine to someone’s day. Thanks for stopping by and I'll see you next post!

Happy Crafting!
Lauren Alarid
2018 Artisan Design Team


Tuesday, September 25, 2018

Stampin' Up! Farmhouse Christmas - Christmas Card


Hey peaches! I'm back on the blog today sharing a card that I made using the new Farmhouse Christmas Set. I just think this set is so great! It obviously is great for country style Christmas cards, but I also think it extends beyond Christmas too. The beautiful house can be colored any way you like so you could easily create a "new home" card for a neighbor or friend. It's so versatile!


There is a TON of texture on this card. I've included a list of supplies used below if you want to know everything that I used. However, I did want to include a little detail on how I colored the tree because i'ts hard to capture on film but so pretty!

I stamped the tree onto Watercolor Paper as I intended to watercolor it. I used Gray Granite Ink and my Aqua Painter to color it. The added steps here that really make this tree beautiful are two-fold. Fresh after adding a Gray Granite Ink watercolor layer, I used a tiny bit of Bright Copper Shimmer Paint to add a little shimmer to my tree. I just use what's in the lid of the paint and my Aqua Painter to add it to my tree (make sure to rinse your brush thoroughly after using the paint). The next step was that I used my Gray Granite Stampin' Write Marker to add a few lines to the trunk of my tree. It's so pretty in person!


I hope you have enjoyed today's card! Thanks so much for stopping by and I'll see you next post!


Don't forget! You can find me on Instagram and Facebook! Happy stamping!

08.01.18_BONUS-DAYS_DEMO_LP-HEADER_EN

Bonus Days are back!!! For every $50 you spent during the month of August, you will have earned a $5 bonus coupon. Redeem your coupon codes September 1-30. Use my host code (XMUDHWJ9) for even more bonus items. Contact me for more info: Craftylittlepeach@gmail.com
Host A Party

Get your friends together and host a party to earn Stampin' rewards during the month of August! Contact me to book an event!

To order online: 
September 2018 Hostess Code:
XMUDHWJ9


 If you’ve considered joining, it's a truly great time! For just $99, you can select $125 of your choice of product AND earn a 20% discount on purchases from the Annual Catalog. This is an amazing deal! If you want to join my team, click here or please email me!


Supplies:

Thursday, September 20, 2018

Beautiful Promenade - Stampin’ Up! Artisan Blog Hop


Well, hello peaches! Welcome to the Beautiful Promenade Stampin' Up! Artisan Design Team Blog Hop! Each month our very talented and creative team of designers will be bringing you inspiration, so get comfortable and have a ton of fun hopping along with us. You may have just arrived from the wonderfully talented Kim McGillis' Blog. She has create the cutest projects!


Today, I will be showcasing the Petal Promenade Stamp Set and products from the Petal Promenade Suite. This suite has some lovely florals and gorgeous greenery, but even if you're not into florals, you'll fall in love with the Beautiful Promenade Stamp Set. I's a gorgeous blend of geometric shapes, eye-catching patterns, and wonderful sentiments. 


Beautiful Promenade Photopolymer Bundle

For today's projects, I created a matching card set. For my first card, I began with a sheet of Watercolor Paper and I used the diamond shape stamp to stamp in Balmy Blue Ink and Highland Heather Ink. I used my Aqua Painter to create a watercolor wash over the stamped images. I stamped the main floral image in Balmy Blue and then used my Sponge Dauber to add Highland Heather Ink in the center. The sentiment was embossed in Silver Embossing Powder.

 For the next card I began with a Watercolor Paper panel.To create the background: 

  1. Watercolor your background with Smokey Slate Ink 
  2. Then use the diamond patterned mask from the Pattern Party Decorative Masks and Embossing Paste over the watercolored background to add additional dimension and interest.
  3. Use your Aqua Painter to flick on some Smokey Slate Ink splatters.
  4. Allow the background to dry. 
To create the two-toned metallic edged flower, I stamped just the outer edge of the flower stamp in Versamark Ink over the already stamped Balmy Blue Flower and added Silver Embossing Powder. It's such a fun effect.

To finish off this card, I added some Silver Metallic Thread, some Silver Mini Sequin Trim, and a few silver sequins from the Metallic Sequin Assortment. I just love the shine they add!


 For my final card, I die cut the largest geometric shaped die from Vellum. I stamped the smaller flowers in Highland Heather Ink and did the same technique as before to add a silver edge to them. I finished it off with a few metallic sequins.


Here's a close-up of my cards:


This suite of products was so fun and inspiring! I just adore the sentiments in this set. They are wonderfully encouraging. I hope you have enjoyed all of today's cards and designs (full list of supplies below). Keep hopping along and check out my other fellow teammates’ pages. They have some pretty amazing projects to share. I’ve listed them, along with all products used below or you can just click the link below to hop to the lovely Linda Van Wely-Zwolle


Don't forget: Stampin' Up! features a corporate blog post each Thursday of the month where we Artisans share creative tips, tricks, and strategies. You can find these posts in the "notes" section of the Stampin' Up! Facebook Page.Thanks so much for stopping by and I’ll see you next post!


2018 Artisan Design Team
Sylwia Schreck

Don't forget! You can find me on Instagram and Facebook! Happy stamping!

08.01.18_BONUS-DAYS_DEMO_LP-HEADER_EN

Bonus Days are back!!! For every $50 you spent during the month of August, you will have earned a $5 bonus coupon. Redeem your coupon codes September 1-30. Use my host code (XMUDHWJ9) for even more bonus items. Contact me for more info: Craftylittlepeach@gmail.com
Host A Party

Get your friends together and host a party to earn Stampin' rewards during the month of August! Contact me to book an event!

To order online: 
September 2018 Hostess Code:
XMUDHWJ9


 If you’ve considered joining, it's a truly great time! For just $99, you can select $125 of your choice of product AND earn a 20% discount on purchases from the Annual Catalog. This is an amazing deal! If you want to join my team, click here or please email me!


Supplies:

#TGIFC336 Color Challenge

   Hey peaches and thanks for joining me for another fun TGIF challenge this week! If you're new to the  TGIF Challen ges , each Friday,...