Showing posts with label crafting. Show all posts

Wednesday, November 22, 2017

Merry Little Labels Treat Gift Box

Hey crafty friends! I wanted to share a fun little project with you today. I often love giving delicious treats during the holidays. I really love these adorable Mini Pizza Boxes for delivering my handmade goodies. They can be colored in any color you like and even stamped on. You can create fun tags to them for an added creative touch and even add stenciled on patterns to name just a few ideas. To top it all off, these boxes are food safe, so you can put all kinds of treats in them.


For my project today, I took a piece of patterned paper from the Merry Little Christmas Designer Series Paper (DSP) and cut it down to wrap my box. After wrapping it around my box, I cut a few circles, one from Basic Black Cardstock and one from Pool Party Cardstock, and adhered them to the patterned paper. Next, I took some Bermuda Bay 3/8” Stitched Satin Ribbon and wrapped it around my box. I then, took a stamp from the Merry Little Labels Stamp Set and stamped it in Basic Black Ink onto some Bermuda Bay Cardstock and used the coordinating punch to punch it out. I added a strand of Silver Mini Sequin Trim behind it and added it to my box. To finish it off, I die cut a few snowflakes, added a bow made from Pool Party Solid Baker’s Twine, and added some Rhinestone Basic Jewels. Well, that’s my project for today! I hope you liked it and I’ll see you next post!


Get your friends together and host a party to earn Stampin' rewards during the month of September! Contact me to book an event!


To order online: 
November 2017 Hostess Code:
CPV3WPVY


 If you’ve considered joining, it's a truly great time! For just $99, you can select $125 of your choice of product AND earn a 20% discount on purchases from the Annual Catalog.  This is an amazing deal! If you want to join my team, click here or please email me!
Say hello to a new world of colorful creativity! Meet Stampin’ Blends, artist-quality alcohol markers in 12 exclusive Stampin’ Up! colors. To cover all the blending bases, we’re also offering a limited-time 16-card project kit and stamp set with beautiful line-art images.

Stampin’ Blends Product Features:

  • Add just the right amount of color where you need it with the brush tip or fine-point. 
  • Each color (except Ivory and Bronze) has a light and dark shade marker, available individually or in a combo pack. 
  • We have done in-house testing for evaporation and life testing and are really happy with the results, so you can feel confident sharing them with your customers. 
  • Press fit seal prevents air from entering the barrel and causing evaporation. 
  • The nestable lids are easy to keep track of and have a tight fit for long-lasting color.


Check out the video below to see these amazing markers in action:


INTRODUCING THE STAMPARATUS: A NEW WAY TO STAMP!

It’s big news when something breaks the mold and changes everything. That’s why we were SO excited to introduce the Stamparatus! It is, quite simply, the best tool of its kind on the market today and it will change the way you stamp. In fact, before long you’ll wonder how you crafted without it. 


Why do YOU need one? You’ll fall in love with stamping all over again when you learn everything you can do with it!
  • Make multiples with ease 
  • Consistently stamp crisp, clean images
  • If you want a darker impression, apply more ink and restamp—no need to start over
  • Make fewer mistakes, saving time and money
  • Easily create 2-step, 3-step, and 4-step stamped images using reversible plates
  • Develop new and specialized stamping techniques with adjustable stamping plates and precision placement


I need product details!
  • Compatible with Stampin’ Up!’s red rubber and photopolymer stamp
  • Foam mat to use with photopolymer stamps
  • Rulers and gridlines for quick measuring
  • 2 open sides so you can stamp on larger paper
  • 2 reversible plates: a total of 4 surfaces to work with
  • 2 magnets to hold the paper in place
  • Magnet storage areas
  • Retail Price–$49.00 USD/$65.00 CAD

RESERVE NOW for the November 16-30, 2017 reservation window with delivery on or around February 1, 2018. The reservation window opens at 2:00 PM (MT) on November 16. While supplies last. Check out this amazing tool and how it works in the video below. If you have any questions about ordering feel free to contact me @ Craftylittlepeach@gmail.com


Monday, November 13, 2017

Super Exciting News!!!! Plus Bonus Christmas Card

Okay guys, this may be a bit longer of a post than usual because I have so much to share! Today is the day that I can finally share with the world that I have been chosen to be a part of Stampin’ Up!’s elite 2018 Artisan Design Team! Ahhhhhhhh! I got the call back in September, asking me if I’d like to be a part of the team and of course I said yes! Well, I’m pretty sure there was a “yes” in there somewhere amidst the screaming, lol. If you’re wondering, “What/Who is/are the Artisan Design Team and what do they do?” Well, they are a very talented group of Stampin’ Up! demonstrators who create, blog about, and share inspiring projects. Additionally, I’ll be participating in a monthly blog hop with the design team, so keep an eye out for those starting in January. Each year Stampin’ Up! selects a handful (16 this year) of members from around the world and I’m so honored to be one of them!!! It’s an amazing opportunity and I’m so excited to be a part of it! I will include a list of the names of the other 15 members at the end.

As a new member, I received an absolutely amazing welcome gift. It was a lovely white box, decorated in gorgeous SU product of course, and inside this beautiful box was a welcome letter, along with my own personalized stamp (eeeeeeeeeeh!!!) and a little blue box from Tiffany’s. This is actually my first blue box ever! Inside was a stunning charm bracelet with a heart charm that was engraved with the lovely Artisan Design Team logo. I’ve included pictures below.


 Now that I’ve shared my big news, I’ll move on to my card. I’m just going to go over one aspect of it as I’ve already made this post long enough, lol.

Have you ever thought, “Darn! If I only had some patterned paper in THAT color or pattern.” Well, I do this on occasion. Luckily, one of the things I love about Stampin’ Up! is that the products all are designed to coordinate effortlessly so it takes all the guess work out of crafting. However, some days I’m looking for something specific or that I might have run out of and that’s when I get the most creative. I have to come up with clever ways to get a look I’m going for. For example in today’s card, I wanted black paper with white polka dots, but I didn’t have any on hand. So...I just made my own! I took one of the round stamps from the Paisleys and Posies Stamp Set (pictured below) to make my polka dots. But I didn’t want the pattern to stamp, so I just flipped it over and stamped on its backside. Did you know you could do that? Now you’ve just doubled your stamp possibilities!


I inked it up in Versamark ink and stamped all over my Basic Black Cardstock until I was happy with the design. Then I added White Embossing Powder on top, heat set it, and voila, you have your very own polka dot patterned paper! Don’t forget to check out the backside of your stamps. The solid image they can create can give you a totally different look and add so much versatility to your projects.


I even got to try out my new personalized stamp! I LOVE it!


I’m so happy you stoped by and so excited for the upcoming year! Prepare to be inspired! See you next post!

Here’s the list of my fabulous fellow team members 
(In alphabetical order)

2018 Artisan Design Team:
Susan Wong

Get your friends together and host a party to earn Stampin' rewards during the month of September! Contact me to book an event!


To order online: 
November 2017 Hostess Code:
CPV3WPVY


 If you’ve considered joining, it's a truly great time! For just $99, you can select $125 of your choice of product AND earn a 20% discount on purchases from the Annual Catalog.  This is an amazing deal! If you want to join my team, click here or please email me!
Say hello to a new world of colorful creativity! Meet Stampin’ Blends, artist-quality alcohol markers in 12 exclusive Stampin’ Up! colors. To cover all the blending bases, we’re also offering a limited-time 16-card project kit and stamp set with beautiful line-art images.

Stampin’ Blends Product Features:

  • Add just the right amount of color where you need it with the brush tip or fine-point. 
  • Each color (except Ivory and Bronze) has a light and dark shade marker, available individually or in a combo pack. 
  • We have done in-house testing for evaporation and life testing and are really happy with the results, so you can feel confident sharing them with your customers. 
  • Press fit seal prevents air from entering the barrel and causing evaporation. 
  • The nestable lids are easy to keep track of and have a tight fit for long-lasting color.


Check out the video below to see these amazing markers in action:


Monday, November 6, 2017

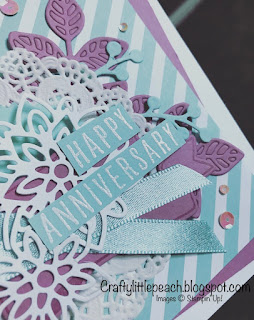
Banners For You Anniversary Cards

It’s Monday Peaches and you know what that means! It’s time for a brand new post! Today I wanted to share with you my thought process on how I create layering on my cards. It’s really an organic process for me and I love the results.


The first step for me is to chose a color scheme that I like. In previous blog posts I’ve explained my color choosing process in more detail, but for the sake of simplicity and the purpose of this post, I’ll just say that my color scheme is influenced by many factors. I may have seen a color combo in nature that catches my eye. I may have been inspired by an accidental arrangement of scraps from previous projects lying on my craft table, or I may find my color muse in fashion, as I did for today’s projects. I know this is going to sound funny but I saw this ansamble in a fashion show of bright lime greens and black and white and it was just so appealing to the eye, so I knew I had to try it. After I’ve got my color choices, I’m on to choosing my stamp set.

Most often I choose my stamp set by need or in preparation of an upcoming event, and that’s how I decided on the stamp set Banners For You. This set has TONS of sentiments as well as beautiful floral images, and of course, banners! The sentiments are designed to fit within the banners and some even curve to fit the more curvy banners! The other benefit of this stamp set and die set is that I get to use the banner elements for layering, so I reach for this set even when it’s not the original set I have planned to use for a project. I just can’t stop using it!

So now that I’ve got my colors and stamps chosen I’m ready for layering. I like to choose an array of shapes to layer on to each other. The purpose of this is to make the eye dance a little. Creating visual angles makes the eye move all ove the project and makes it very visually appealing. I also like to add different textures to my layering like crumpled paper, ribbon, or other trim. Just play with the different items you have to see what you like. The idea is to create different textures and angles and shapes to create eye-appealing variation.

This concept applies to my next layering aspect-the sentiment. Usually, the rule for me is that if you’ve got quite a bit of color or layers happening on your project, a simple white embossed sentiment on a black cardstock works best. This is because it’s quite bold and stands out easily on a project and matches with most color schemes. However, there are times when I just choose one of the colors that has minimal representation on my project and just simply stamp in that color onto my Whisper White Cardstock. Sometimes I just have to play with a few options before I get an idea of what works best.

As a final touch, I like to add sequins or some kind of bling. The rule of thumb is odd numbers of accents. On a more “busy” card, I generally don’t use more than 3 embellishments. However I’ve been know to break that “rule” when it comes to bling. I am a huge fan of all things sparkly so it’s hard for me to restrain myself, lol. As far as the arrangement of my elements, I like to create a visual triangle. For whatever reason, it’s is the most attractive configuration for the eye, so I like to use it often. However, I do like to change it up a bit, just for the sake of trying something new as you’ll see in my projects today.

Of course this is all just my opinion. Some crafters find this style too busy, so you must find what you like and what works for you. Hopefully you can take a few tips away from this post to or maybe it will help you to find your own creative process. I just wanted to share my process because I know that often I find myself curious about others’ processes. I hope this was helpful and I look forward to sharing again with you next post! See you on Wednesday!


Get your friends together and host a party to earn Stampin' rewards during the month of September! Contact me to book an event!

To order online: 
November 2017 Hostess Code:
CPV3WPVY
Or email me @ Craftylittlepeach@gmail.com


 If you’ve considered joining, it's a truly great time! For just $99, you can select $125 of your choice of product AND earn a 20% discount on purchases from the Annual Catalog.  This is an amazing deal! If you want to join my team, click here or please email me!
Say hello to a new world of colorful creativity! Meet Stampin’ Blends, artist-quality alcohol markers in 12 exclusive Stampin’ Up! colors. To cover all the blending bases, we’re also offering a limited-time 16-card project kit and stamp set with beautiful line-art images.

Stampin’ Blends Product Features:

  • Add just the right amount of color where you need it with the brush tip or fine-point. 
  • Each color (except Ivory and Bronze) has a light and dark shade marker, available individually or in a combo pack. 
  • We have done in-house testing for evaporation and life testing and are really happy with the results, so you can feel confident sharing them with your customers. 
  • Press fit seal prevents air from entering the barrel and causing evaporation. 
  • The nestable lids are easy to keep track of and have a tight fit for long-lasting color.


Check out the video below to see these amazing markers in action:


#TGIFC336 Color Challenge

   Hey peaches and thanks for joining me for another fun TGIF challenge this week! If you're new to the  TGIF Challen ges , each Friday,...