Monday, April 20, 2020

Stampin' Up! Tips & Tricks - Embellishment Customization

I just adore “From My Heart Faceted Gems”and how they add just the right touch of sparkle to any project. They come in Flirty Flamingo, Real Red, and white, but the white gems can be customized into just about any color with your Stampin’ Blends Markers 
Use your Take Your Pick Tool to pick out the white gems and to hold them in place as you use your Blends to color your gems. The pointed tip of the tool is useful to help rotate the gem as well, to ensure all sides are covered in ink.
You can add multiple layers of ink, allowing each layer to dry before adding more to get a darker, more vibrant color. 
I used the Poppies Moments Dies for my lovely flowers and part of a sentiment from the Seriously the Best Stamp Set. You don't need too many elements for a look that is simple and soft, yet so elegant.

After coloring my gems in Highland Heather Stampin’ Blends Markers, I was able to perfectly pair my gems to my watercolor background (which was created using Highland Heather, Flirty Flamingo, and Petal Pink Inks). Here's a close-up of the gems:

Friday, April 17, 2020

#TGIFc260 - Technique Time


Hey peaches and thanks for joining me for another fun TGIF challenge this week! If you're new to the TGIF Challenges, each Friday, we offer a new themed challenge for you to play along with. Be sure to check out the main blog for more details, inspiration, and the guidelines. This week's challenge is a technique challenge and it was so much!
My card for this week's challenge was made using a combination of the Peaceful Moments Bundle and the Painted Poppies Bundle. I was inspired to use this layout and these colors from a fellow stamper friend, the talented Nina Waldschmidt. Here's my submission:
This week's technique is all about the belly bands. I think they add so much interest in a project, so I went bold with mine. I just loved that Sale-A-Bration DSP with the stripes, so  for this bold belly band I was able to recreate the look by using a straight edge and coloring some Whisper White Cardstock with my Basic Black Blends.
The flowers were created by stamping on vellum and embossing with white embossing powder. I also, used Coastal Cabana Ink to stamp the floral images onto the top and bottom. Here's a close-up of my project:

Thanks so much for stopping by and we would love it if you would join in on the fun! Come check out the TGIFChallenges Blog for more information and more challenges! Participants will have until the following Thursday at 10am PST to post your projects to the TGIF Blog Page. Don't forget to add the hashtag #tgifc260 when you share so we can see what you come up with!
Thanks so much for stopping by and I'll see you next post!
Don't forget! You can find me on Instagram and Facebook! Happy stamping!

Use my host code G6V23JJU) for monthly bonus items. Contact me for more info: Craftylittlepeach@gmail.com 

Host A Party


Get your friends together and host a party to earn Stampin' rewards during the month of April! Contact me to book an event!

To order online: 
April 2020 Hostess Code:
G6V23JJU

Starting January 3, hosts with qualifying orders can receive additional Stampin’ Rewards. Below are the markets, qualifying amounts, and additional Stampin’ Rewards they can receive.


 If you’ve considered joining, it's a truly great time! For just $99, you can select $125 of your choice of product AND earn a 20% discount on purchases from the Annual Catalog. This is an amazing deal! If you want to join my team, click here or please email me!

Thursday, April 16, 2020

Stampin' Up! Corporate Blog Post - Timeless Tropical Masculine Vs. Feminine

Timeless Tropical Masculine Vs. Feminine
Hello, everyone! My name is Lauren Alarid. I’m a Stampin’ Up! demonstrator in California and 2019 Artisan Design Team member, and I am so happy to be sharing my creativity on the company blog (link to all of Stampin' Up!'s corp. blog posts here). Today I wanted to share with you the awesome versatility of the Timeless Tropical Bundle by creating both a feminine and masculine version with the same layout.
TIMELESS TROPICAL BUNDLE (ENGLISH)
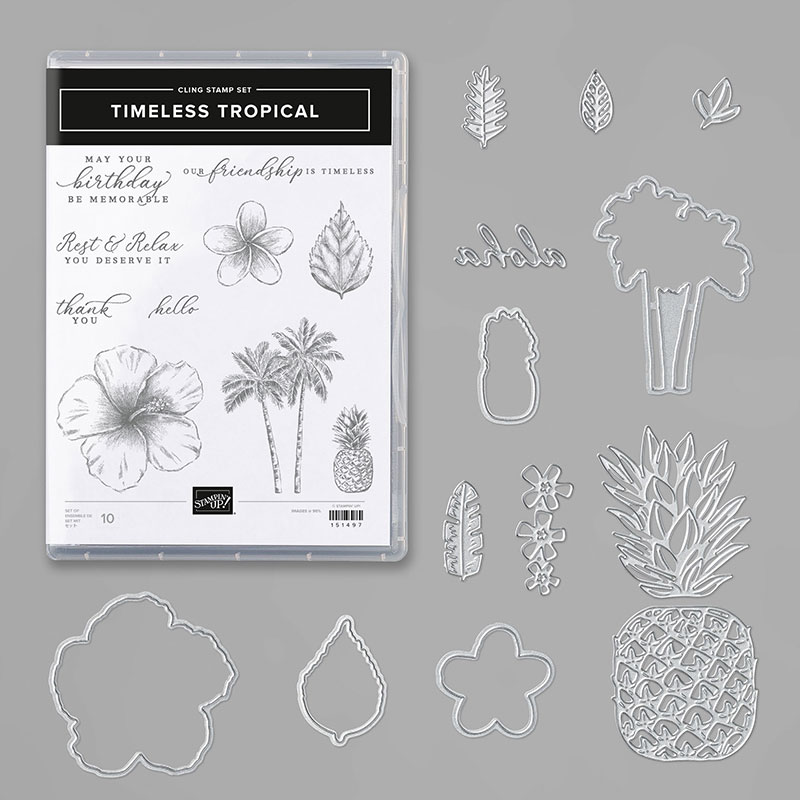
Being able to use a set for multiple occasions and purposes is always something that has been important to me in a stamp set. It can be especially tricky at times to be able to use one stamp set for both feminine and masculine cards, but if you can come up with a simple layout and a great set like the Timeless Tropical, you get more bang for your buck.  
As mentioned before, for each card I started out with a basic layout. I began with (what is more challenging for me) the masculine card. The palm trees image is a great neutral image that works great and it allowed me to use more masculine tones. I first used my Many Marvelous Markers (Pear Pizzazz and Garden Green) to create two-tone palm fronds and then used the Soft Suede marker for the trunk. I stamped it once on some scrap paper to be die cut out and then in second generation ink (stamped off twice) onto a die cut panel made with the 2nd largest rectangle from the Stitched Rectangles Dies. 
To really give this card a more distressed, masculine look, I created a textured and torn double-layer panel. I created this by first taking a 4” x 5 ¼” piece of Gray Granite Cardstock and ran it through my embossing machine with the Corrugated 3D Embossing Folder. Next, I embossed another panel of the same dimensions, made with Gary Granite Cardstock with the Coastal Weave Embossing Folder. After embossing it with the weaved embossing folder, I tore some of the edges of the longest sides of my panel so that, when layered on top of the corrugated one, you could see both types of texture (almost like when you tear away a layer from a packing box). This extra step gives my card a more roughed up effect which contributes to the masculine look I was gong for. The picture below shows an up-close look at all that gorgeous texture.    
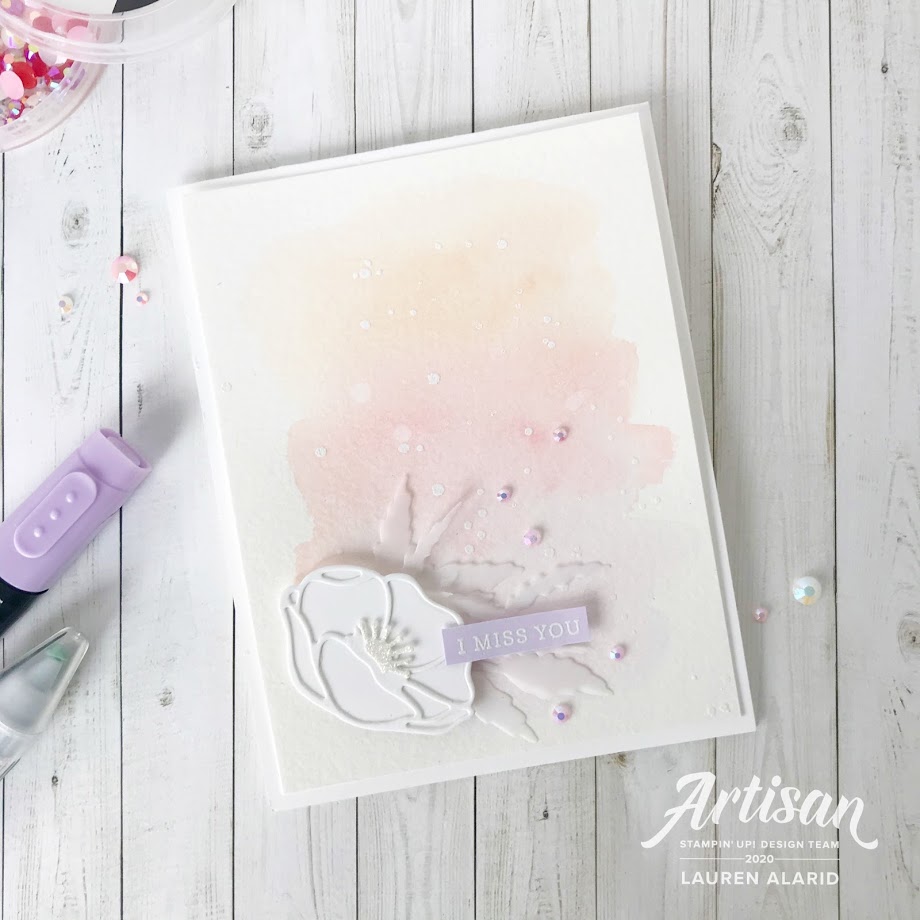
For my feminine version, I used a lot of the same colors and materials, with a few differences. To get a softer look, I stamped my floral images in Flirty Flamingo Ink onto Fluid 100 Watercolor Paper. Then I used my Aqua Painter over the images with just clean water from the brush to get a soft pink result.
For my white panel, instead of the stitched rectangle, I used the largest rectangular shape from the Stitched So Sweetly Dies. I also added a few gems in the center of my flowers as well as for accents.
To finish both cards off, I added some Braided Burlap Trim behind my sentiments (I pulled apart and tattered the ribbon more for my masculine version), some Linen Thread, and a few Tropical Oasis Trinkets.
I hope that you have enjoyed my projects today. It’s so great when we can get more use out of our sets and create endless possibilities with them. I hope that you give your sets a second look to see how many other ways you can create with them, and really make them shine!
Happy Crafting!
Lauren Alarid
2019 Artisan Design Team
Thanks so much for stopping by and I'll see you next post!
Don't forget! You can find me on Instagram and Facebook! Happy stamping!

Use my host code G6V23JJU) for monthly bonus items. Contact me for more info: Craftylittlepeach@gmail.com 

Host A Party


Get your friends together and host a party to earn Stampin' rewards during the month of April! Contact me to book an event!

To order online: 
April 2020 Hostess Code:
G6V23JJU

Starting January 3, hosts with qualifying orders can receive additional Stampin’ Rewards. Below are the markets, qualifying amounts, and additional Stampin’ Rewards they can receive.

 If you’ve considered joining, it's a truly great time! For just $99, you can select $125 of your choice of product AND earn a 20% discount on purchases from the Annual Catalog. This is an amazing deal! If you want to join my team, click here or please email me!

Stampin' Up Artisan Blog Hop - Country Club/Mountain Air

Well, hello peaches! Welcome to the Country Club/Mountain Air Stampin' Up! Artisan Design Team Blog Hop! Each month our very talented and creative team of designers will be bringing you inspiration, so get comfortable and have a ton of fun hopping along with us. You may have just arrived from the wonderfully talented Jan Clothier's Blog. She has made some lovely projects!
Country Club
Today, we will be showcasing products using both the Mountain Air Bundle and the Country Club Suite Bundle. These bundles may not be designed to coordinate together, but after playing with them, I think they pair beautifully together to create those fantastic masculine cards. Here's a look at the entire suite of products, along with the other bundle:
COUNTRY CLUB SUITE BUNDLE
MOUNTAIN AIR BUNDLE
 For my first project today, I roughed up some Pool Party Cardstock using my Paper Snips. I feel like this gives my cards that textured, masculine quality. This is a simple technique. You just rub the inside of your scissors blade along the edge lightly at first. After you start to see the edges getting rougher, you can either stop there or continue to rub to get a few rougher areas. Repeat on all four sides as desired. Here's a close up of the effect:
I stamped my golfer image in Pretty Peacock Ink and layered in some Granny Apple Green trees from the Majestic Mountain Dies. To finish off my card, I added one of the wood accents from the Country Club Elements
For my next card and final card I wanted a bold background so I created a white panel made using the Absolutely Argyle 3D Embossing Folder layered beneath a die cut piece of Pretty Peacock Cardstock. I love the striking contrast this created. I used one of the dies from the bundle and die cut a shape from the Country Club Designer Series Paper and layered it behind my sentiment. I again used Granny Apple Green Cardstock for my trees and added another wood element to frame my sentiment.
I had so much fun creating these fabulous products. I hope you have enjoyed all of today's cards and designs. Keep hopping along and check out my other fellow teammates’ pages. They have some pretty amazing projects to share. I’ve listed them, along with all products used below or you can just click the link below to hop to the fabulously creative Leah Fedynak

Don't forget: Stampin' Up! features a corporate blog post each Thursday of the month where we Artisans share creative tips, tricks, and strategies. You can find these posts in the "notes" section of the Stampin' Up! Facebook Page.Thanks so much for stopping by and I’ll see you next post!

Thanks so much for stopping by and I'll see you next post!
Don't forget! You can find me on Instagram and Facebook! Happy stamping!
Use my host code (HGA6ZKHN) for monthly bonus items. Contact me for more info: Craftylittlepeach@gmail.com 

Host A Party


Get your friends together and host a party to earn Stampin' rewards during the month of January! Contact me to book an event!

To order online: 
January 2020 Hostess Code:
HGA6ZKHN

Starting January 3, hosts with qualifying orders can receive additional Stampin’ Rewards. Below are the markets, qualifying amounts, and additional Stampin’ Rewards they can receive.

 If you’ve considered joining, it's a truly great time! For just $99, you can select $125 of your choice of product AND earn a 20% discount on purchases from the Annual Catalog. This is an amazing deal! If you want to join my team, click here or please email me!

Friday, April 3, 2020

#TGIFc258 - Color Challenge


Hey peaches and thanks for joining me for another fun TGIF challenge this week! If you're new to the TGIF Challenges, each Friday, we offer a new themed challenge for you to play along with. Be sure to check out the main blog for more details, inspiration, and the guidelines. This week's challenge is a color challenge and I absolutely love it!
My card for this week's challenge was made using the Peaceful Moments Bundle. Here's my submission:
I love those rainbow roses that you can create with a fun little science experiment using dyed water, and wanted to create a similar look with this card. To achieve this look, I used Watercolor Paper and my Aqua Painter to color my flowers. The inks I used to create my rainbow flowers were Melon Mambo, Pineapple Punch, Bermuda Bay, and Pacific Point.


Thanks so much for stopping by and we would love it if you would join in on the fun! Come check out the TGIFChallenges Blog for more information and more challenges! Participants will have until the following Thursday at 10am PST to post your projects to the TGIF Blog Page. Don't forget to add the hashtag #tgifc258 when you share so we can see what you come up with!
Thanks so much for stopping by and I'll see you next post!
Don't forget! You can find me on Instagram and Facebook! Happy stamping!

Use my host code (G6V23JJU) for monthly bonus items. Contact me for more info: Craftylittlepeach@gmail.com 

Host A Party


Get your friends together and host a party to earn Stampin' rewards during the month of April! Contact me to book an event!

To order online: 
April 2020 Hostess Code:
G6V23JJU

Starting January 3, hosts with qualifying orders can receive additional Stampin’ Rewards. Below are the markets, qualifying amounts, and additional Stampin’ Rewards they can receive.


 If you’ve considered joining, it's a truly great time! For just $99, you can select $125 of your choice of product AND earn a 20% discount on purchases from the Annual Catalog. This is an amazing deal! If you want to join my team, click here or please email me!

Wednesday, April 1, 2020

Stampin' Up Artisan Blog Hop - Ornate Garden 2

Well, hello peaches! Welcome to the 2nd Ornate Garden Stampin' Up! Artisan Design Team Blog Hop! I'm so excited to be sharing a few projects using some stunning new products from the upcoming Ornate Garden SuiteFor a limited time (April 1-May 31, 2020), you can get your hands on these exclusive products. This suite is packed with amazing product and the team has come up with some awesome inspiration, so be sure to hop all the way through so that you don't miss ANY of it! You may have just arrived from the wonderfully talented Jan Clothier's Blog. I just LOVE what she has created!
Ornate Garden Suite Collection (#154153):
  • #1 Bundle (#154115): Ornate Thanks Photopolymer Stamp set (#149471) and Ornate Borders Dies (#152724) 
  • # 2 Bundle (#154119): Ornate Style Cling Stamp Set (#152572) and Ornate Layers Dies (#152726)
  • Gilded Gems Embellishments – adhesive backed opaque Gold (#152478)  
  • Ornate Garden Ribbon – two pack combo of Old Olive and Terracotta Tile (#152479) 
  • Ornate Floral 3D Embossing Folder (#152725)
  • Ornate Garden Specialty Designer Series Paper (#152488) 
Bundle #1

    Bundle #2
      For this hop I made two cards, both showcase these beautiful bundles. Here are my projects using the Ornate Style Stamp Set, the Ornate Layers Dies, the Ornate Thanks Stamp Set, and the Ornate Borders Dies:
      For my first card, I layered on a panel of Vellum and then a second panel of that gorgeous Mint Macaron patterned paper from the Ornate Garden Specialty Designer Series Paper (DSP). I used one of the border dies from the Ornate Borders Dies made from Pretty Peacock Cardstock to layer under my sentiment. I created a two-toned sentiment by inking and stamping my sentiment in Pretty Peacock Ink, allowing it to dry completely, and then inking the lower portion of that same stamp in Versamark Ink. I then added some Gold Embossing Powder and set it. The flower image was colored with both Mint Macaron Blends and Pretty Peacock Blends. To finish it off, I added a few extra die cut flowers, some of those gorgeous Gilded Gems, and some of the Ornate Garden Ribbon.
      My second card is a bit more simple, but because this suite is so versatile, it makes any card look divine with very little effort. I used one of the border dies to create the delicate edging of my first Rich Razzleberry panel layer. I also used the Ornate Floral Embossing Folder for added texture. The tiny little dots of Peacock color are the pieces that were popped out from the border die used in the previous card. I thought they fit perfectly as centers for my flower elements. I stamped a few of those sweet little flowers and colored them with my Blends. I finished this card off by adding a few of the Gilded Gems Embellishments. These are such gorgeous little gold gems that add just the right finishing touch to your projects. 
      Here's a close-up of that lovely Floral Embossing Folder and the perfect texture that it adds:
      Lastly, here are the two other projects that I made from the previous hop:
      This stunning suite of products is so fun to work with and coordinate beautifully with each other seamlessly. It has everything you need to celebrate your creativity! I hope you have enjoyed all of today's cards and designs. Keep hopping along and check out my other fellow teammates’ pages. They have some pretty amazing projects to share. I’ve listed them, along with all products used below or you can just click the link below to hop to the fabulously creative Leah Fedynak

      Don't forget: Stampin' Up! features a corporate blog post each Thursday of the month where we Artisans share creative tips, tricks, and strategies. You can find these posts in the "notes" section of the Stampin' Up! Facebook Page.Thanks so much for stopping by and I’ll see you next post!


      Thanks so much for stopping by and I'll see you next post!
      Don't forget! You can find me on Instagram and Facebook! Happy stamping!
      Use my host code (WMM6NTSB) for monthly bonus items. Contact me for more info: Craftylittlepeach@gmail.com 

      Host A Party


      Get your friends together and host a party to earn Stampin' rewards during the month of February! Contact me to book an event!

      To order online: 
      February 2020 Hostess Code:
      WMM6NTSB

      Starting January 3, hosts with qualifying orders can receive additional Stampin’ Rewards. Below are the markets, qualifying amounts, and additional Stampin’ Rewards they can receive.

       If you’ve considered joining, it's a truly great time! For just $99, you can select $125 of your choice of product AND earn a 20% discount on purchases from the Annual Catalog. This is an amazing deal! If you want to join my team, click here or please email me!

      #TGIFC336 Color Challenge

         Hey peaches and thanks for joining me for another fun TGIF challenge this week! If you're new to the  TGIF Challen ges , each Friday,...