Tuesday, July 24, 2018

Ombré Gradient Embossed Background - Stampin' Up! Instagram Tip


Hey peaches! I have a great creative tip to share with you today! Have you tried creating a gradient effect with your Embossing Paste? It’s really fun and super easy technique, and I think you'll love it!


The first step is to spread a thick line of Embossing Paste across one end of your Whisper White Cardstock


Then choose a few colors of Stampin’ Ink Refills (I chose Melon Mambo, Flirty Flamingo, and Mango Melody) to dab along the paste line. If you like a softer, more muted look, use only a drop or two of ink. If you prefer bright and bold, add more. 


Finally, take your Palette Knife and, in a back and forth motion, spread the color and paste across your cardstock until smooth. This creates a beautiful gradient-textured background with a real “wow” effect that makes your projects pop. 


I'm so happy you stopped by and look forward to seeing you next post!

Host A Party

Get your friends together and host a party to earn Stampin' rewards during the month of July! Contact me to book an event!

To order online: 
July 2018 Hostess Code:
FKXPY4VC


 If you’ve considered joining, it's a truly great time! For just $99, you can select $125 of your choice of product AND earn a 20% discount on purchases from the Annual Catalog. This is an amazing deal! If you want to join my team, click here or please email me!


PLUS LIMITED-TIME OFFER: FREE INK PAD ASSORTMENT WITH STARTER KIT

During the Stampin' Pad Family Promotion, which runs July 1 through July 31, all new demonstrators will be able to select a FREE assortment of Classic Stampin' Pads in addition to their Starter Kit! If you were waiting for the perfect time to join Stampin' Up!, that time has arrived. Join now, and start your new business off on the right foot!


Supplies:

Thursday, July 19, 2018

Broadway Birthday - Stampin’ Up! Artisan Blog Hop

Broadway Bound Suite for Paper Craft and Card Making


Well, hello peaches! Welcome to the Broadway Birthday Stampin' Up! Artisan Design Team Blog Hop! Each month our very talented and creative team of designers will be bringing you inspiration, so get comfortable and have a ton of fun hopping along with us. You may have just arrived from the wonderfully talented Kim McGillis' Blog. I just adore her style!


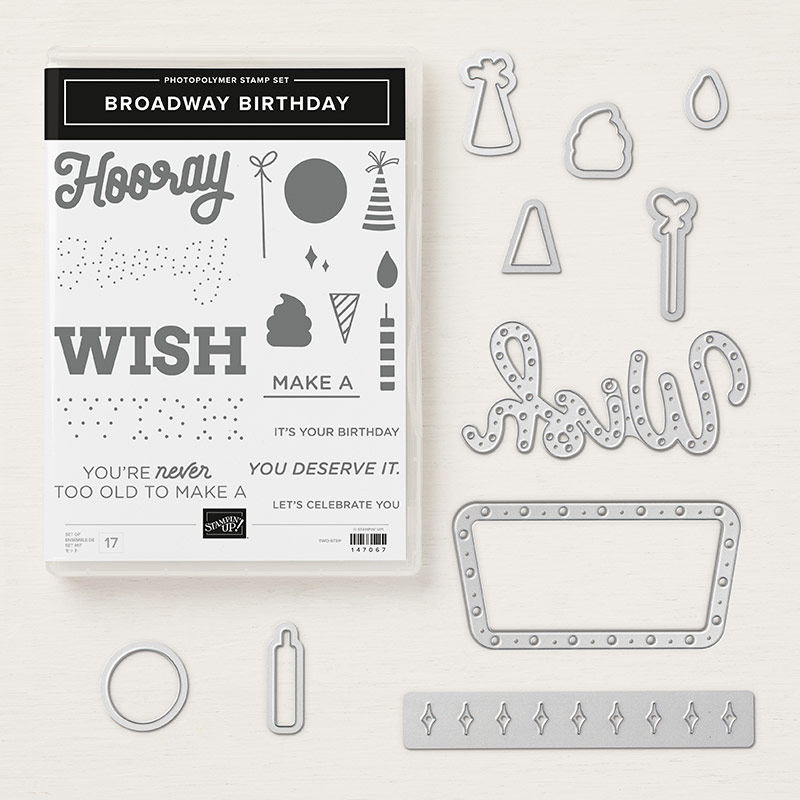
Today, I will be showcasing the Broadway Birthday Stamp Set and Broadway Lights Framelits Dies from the Broadway Bound Suite of products. You'll just love how these fun products coordinate and add pop to any celebration.


Broadway Birthday Photopolymer Bundle

For today's projects, I created a matching card set. For my first card, I began with a sheet of Watercolor Paper and used my Aqua Painter to create a watercolor wash. I began by laying down a light wash of just water first over the general area that I wanted to add color. Then I took my Soft Sea Foam Ink and added some color over the bottom portion of my watercolor background. Then, before the water and color dried, I added some Balmy Blue Ink to the top part of my watercolor background, making sure that the colors mix in the middle. Allow it to dry before adding any other layers. 

The next step is to create and add your layers. I cut the "wish" die cut from Whisper White Cardstock. I layered that on top of a piece of Vellum punched with the Starburst Punch. Under those, I placed a bit of Silver Metallic Thread. To finish it off, I added a few stars, using the die from the Candles & Confetti Framelits Dies, along with two of the sweet little Candle Embellishments


 For the next card I began with a Whisper White Cardstock background and used the birthday candle stamp from the set to stamp in both Soft Sea foam Ink and Balmy Blue Ink alternately towards the upper center of my card. You'll notice that the candle appears longer than the actual stamp is. That's because it is! 

To get a longer candle: 

  1. I just stamped the upper part of my candle 
  2. Then re-stamp it over the candle I just stamped, only a little lower and overlapping the bottom of the original candle a little. 
  3. Repeat this for all five candles.  


To finish off this card, I added some more meta
llic thread, some Silver Mini Sequin Trim, and a few silver stars from the Twinkle Adhesive Backed Sequins. I just love the shine they add!


For my final card, I went all out, lol. I used the same die from the Candles & Confetti Framelits Dies for my confetti background by die cutting some Whisper White Cardstock (4" x 5 1/4") twice, at both ends of my panel. I used a few more of the dies from the Broadway Lights Dies Set to create a few layers in Balmy Blue and Pool Party Cardstock For interest. I stamped a few candles and a party hat to layer behind my "Broadway style" sentiment. The sentiment was created by stamping the "wish" sentiment in Soft Sea Foam Ink and then using the matching dotted stamp to layer on top in Silver Embossing Powder. One key step for successfully getting a clean embossed image, over an already stamped image to to ensure that the first stamped layer is completely dry, before stamping the Versamark Ink and adding your embossing powder. This will help you avoid any stray powder particles.  


Here's a close-up of my cards:


This suite of products was so fun and inspiring! I hope you have enjoyed all of today's cards and designs (full list of supplies below). Keep hopping along and check out my other fellow teammates’ pages. They have some pretty amazing projects to share. I’ve listed them, along with all products used below or you can just click the link below to hop to the lovely Linda Van Wely-Zwolle


Don't forget: Stampin' Up! features a corporate blog post each Thursday of the month where we Artisans share creative tips, tricks, and strategies. You can find these posts in the "notes" section of the Stampin' Up! Facebook Page.Thanks so much for stopping by and I’ll see you next post!


2018 Artisan Design Team

Host A Party

Get your friends together and host a party to earn Stampin' rewards during the month of July! Contact me to book an event!

To order online: 
July 2018 Hostess Code:
FKXPY4VC


 If you’ve considered joining, it's a truly great time! For just $99, you can select $125 of your choice of product AND earn a 20% discount on purchases from the Annual Catalog. This is an amazing deal! If you want to join my team, click here or please email me!


PLUS LIMITED-TIME OFFER: FREE INK PAD ASSORTMENT WITH STARTER KIT

During the Stampin' Pad Family Promotion, which runs July 1 through July 31, all new demonstrators will be able to select a FREE assortment of Classic Stampin' Pads in addition to their Starter Kit! If you were waiting for the perfect time to join Stampin' Up!, that time has arrived. Join now, and start your new business off on the right foot!


Supplies:


#TGIFC336 Color Challenge

   Hey peaches and thanks for joining me for another fun TGIF challenge this week! If you're new to the  TGIF Challen ges , each Friday,...