Wednesday, January 10, 2018

Petal Palette Thank You Card

Happy Wednesday everyone! Today has been pretty awesome! As you all may know by now, I have been chosen among 15 other very talented ladies for the very prestigious honor of representing Stampin’ Up!’s Artisan Design Team for 2018. Well the news was official as of January first and Stampin’ Up! has since then publicly announced the team here on their official Facebook page. It still feels quite unreal, but the bonds that have begun to made with these amazing ladies has already begun and reminded me of how real all of this is. I’m looking forward to this upcoming year and I just know you’re going to love all that we create to inspire you. Here’s a look at the team. You can read a quick bio on each of us through the link mentioned earlier. So let’s get on to today’s inspiration!


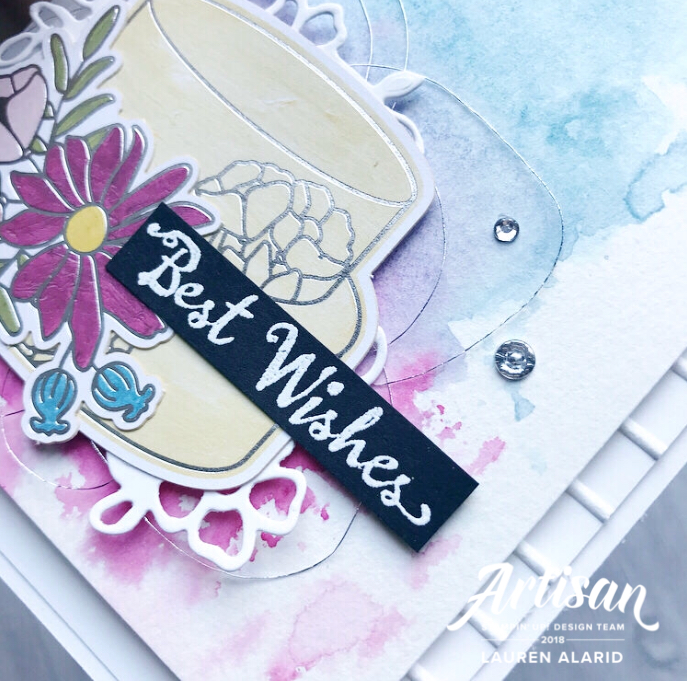
For today’s card, I have used the lovely new Petal Palette Bundle from the new Occasions Catalog. This set looked stunning in the catalog but in person, it’s beyond gorgeous! I don’t think I even realized how many sentiments and images this set actually had! There’s something for just about every occasion.


To start, I like to stamp on my Vellum Cardstock first in order to allow enough time for the ink to dry as vellum tends to absorb slower due to its non-porous nature. I used one of the spotted stamps repeatedly in Dapper Denim Ink on my vellum piece and then set it aside to dry. Next, I stamped my floral image and bird onto Watercolor Paper, the bird in Dapper Denim Ink and the floral image in Berry Burst Ink. Then I took my Aqua Painter and Pink Pirouette Ink Pad and colored in my flower. Since the floral image that I stamped was with Berry Burst and the ink is water based, the Berry Burst ink ran into the watercolor and mixed with the lighter pink which I loved. I did the same with the bird except I used Pool Party Ink. I then set those aside to dry. I stamped the sentiment onto Dapper Denim Cardstock and began to assemble the rest of my card. I put all the layers together and finished it off with Silver Metallic Thread and some Rhinestone Basic Jewels, and that’s my Card for today. Thanks so much for stopping by and I’ll see you next post!


Here's a closer look at the Petal Palette Bundle:


Sale-A-Bration

Sale-A-Bration is one of Stampin' Up!'s biggest sales of the year! Through March 31st, for every $50 USD/$60 CAD you spend, you’ll receive a free Sale-A-Bration product. For anyone who has enjoyed Sale-A-Bration in the past, we have an exciting new announcement for this year: We now have a new reward level, giving you more flexibility and options for your free items.
Let’s break it down:
  • If you spend $50, you get one free level 1 product.
  • If you spend $100, you get one free level 2 product, OR, you can choose two level 1 items.
  • If you spend $150, you have the option to choose three level 1 items or one level 1 item and one level 2 item.

This new option allows everyone to create a personalized Sale-A-Bration experience! Contact me for more info!


Get your friends together and host a party to earn Stampin' rewards during the month of September! Contact me to book an event!


To order online: 
January 2018 Hostess Code:
AKUEKT69


 If you’ve considered joining, it's a truly great time! For just $99, you can select $125 of your choice of product AND earn a 20% discount on purchases from the Annual Catalog.  This is an amazing deal! If you want to join my team, click here or please email me!

Monday, January 8, 2018

Cake Soirée Watercolor Wedding Card

Hello Peaches! How was your holidays? After our trip to Washington, ours were mostly quiet, because, of course, we have been recovering from that awful flu bug going around. Regrettably it feels like we lost a large portion of our holidays, but we’re grateful to be healthy again, and I’m so glad to be back in my craft room again!


Today I have a beautiful watercolor wedding card to share. I’m featuring the Cake Soirée Embellishment Kit and Petal Passion Bundle from the brand new Occasions Catalog (link featured on  the side bar of my blog). You’ll absolutely just fall in love with these two new products! The embellishment kit is full of deliciously gorgeous little embellishments from clothespins, to ribbon, to washi tape, to beautifully detailed cakes and silver foil flower die cuts. I used the cake and a few floral die cuts from this kit on my card today. I've included a picture of this lovely kit below:


To start my card, I started with my Aqua Painter and both my Berry Burst Ink Pad and my Marina Mist Ink Pad to create a watercolor wash on some Watercolor Paper cut at 4 3/4” x 3 1/2”. After the wash dried, I layered watercolor panel on top of a piece of Whisper White Cardstock that I embossed using the new Simple Stripes Textured Impressions Embossing Folder, cut at 4” x 5 1/4”. I layered both of these onto a Whisper White Base.

Next I die cut a few flowers from some Whisper White Cardstock, using the floral dies from the Petal Passion Bundle and layered them behind my cake. I took the “Best Wishes” sentiment from the same set and added it to my cake. Then to finish off my card, I layered some Silver Metallic Thread behind my cake and added a few Rhinestone Basic Jewels. Thanks so much for stopping by and don’t forget to check out the new Occasions Catalog for more gorgeous products and inspiration! See you next post!


Here's a closer look at the Petal Passion Bundle:


Sale-A-Bration

Sale-A-Bration is one of Stampin' Up!'s biggest sales of the year! Through March 31st, for every $50 USD/$60 CAD you spend, you’ll receive a free Sale-A-Bration product. For anyone who has enjoyed Sale-A-Bration in the past, we have an exciting new announcement for this year: We now have a new reward level, giving you more flexibility and options for your free items.
Let’s break it down:
  • If you spend $50, you get one free level 1 product.
  • If you spend $100, you get one free level 2 product, OR, you can choose two level 1 items.
  • If you spend $150, you have the option to choose three level 1 items or one level 1 item and one level 2 item.

This new option allows everyone to create a personalized Sale-A-Bration experience! Contact me for more info!


Get your friends together and host a party to earn Stampin' rewards during the month of September! Contact me to book an event!


To order online: 
January 2018 Hostess Code:
AKUEKT69


 If you’ve considered joining, it's a truly great time! For just $99, you can select $125 of your choice of product AND earn a 20% discount on purchases from the Annual Catalog.  This is an amazing deal! If you want to join my team, click here or please email me!

Wednesday, January 3, 2018

Celebration Time Ombré Cake Birthday Card

Hey Peaches! I don’t know about you but I have a LOT of birthdays in the month of January to celebrate. So I’m playing a little “catch up”/“get ahead of things” so that I can have plenty of birthday cards for all of my friends and family. I actually love creating birthday cards the best (aside from “thank you” cards). I feel like I can make them as bright and playful as I like because it is a celebration of course!

Well, on to today’s card! Today’s birthday card used the Celebration Time Clear Mount Bundle. I love all the cakes and banners and sentiments in this set, and the dies offer even more party options with party hats, confetti, and presents. It’s perfect for any celebration.


To start my card, I die cut out a cake using the cake die from the set out of Watercolor Paper. Then I took my Aqua Painter and both my Bermuda Bay Ink Pad and my Lemon Lime Twist Ink Pad and created a gradual ombré design on just the cake part of the die cut. Ombré cakes are quite popular and I just love the look of them. I cut off the top “now” part of the cake and the bottom cake pedestal because I was planning on making those parts out of Gold Foil Sheets. After the cake dried, I took some Gold Metallic Thread and wrapped it a few times around to create a lined design on my cake layers. Then I die cut out some candles using the candles die from the bundle out of Gold Foil Sheets as well as the pedestal by using the same cake die, except only using the bottom portion of the die. I used the two “pom pom” looking dies from the set and cut out a few flowers and added them to my cake.

For some added texture and fun I took the brand new Scattered Sequins Dynamic Textured Impressions Embossing Folder and embossed some Whisper White Cardstock and added it to my background. This gorgeous embossing folder has so much detail and is available in the new Occasions Catalog available January 3rd-May 31st!  I’ll include close up pictures below so you can see all the beautiful scattered sequins it creates. To finish off my card, I added a few sequins from Iridescent Sequin Assortment. Thanks so much for stopping by and I’ll see you next post! Don’t for get to check out everything that’s new and happening below, during Sale-A-Bration which is Stampin’ Up!’s biggest sale of the year!


Sale-A-Bration

Sale-A-Bration is one of Stampin' Up!'s biggest sales of the year! Through March 31st, for every $50 USD/$60 CAD you spend, you’ll receive a free Sale-A-Bration product. For anyone who has enjoyed Sale-A-Bration in the past, we have an exciting new announcement for this year: We now have a new reward level, giving you more flexibility and options for your free items.
Let’s break it down:
  • If you spend $50, you get one free level 1 product.
  • If you spend $100, you get one free level 2 product, OR, you can choose two level 1 items.
  • If you spend $150, you have the option to choose three level 1 items or one level 1 item and one level 2 item.

This new option allows everyone to create a personalized Sale-A-Bration experience! Contact me for more info!


Get your friends together and host a party to earn Stampin' rewards during the month of September! Contact me to book an event!


To order online: 
January 2018 Hostess Code:
AKUEKT69


 If you’ve considered joining, it's a truly great time! For just $99, you can select $125 of your choice of product AND earn a 20% discount on purchases from the Annual Catalog.  This is an amazing deal! If you want to join my team, click here or please email me!

Monday, January 1, 2018

Magical Day Watercolor Dragon Card

Happy New Year's Peaches!!! Well, it's been a pretty fantastic year already, and with the start of a new year, I can officially use my new Artisan Design Team Logo Watermark!!!!! Woohoo!! But before going on to today's project, I wanted to include a few of my top favorite cards/moments from 2017.


I have really enjoyed this amazing crafty journey so far and look forward to the coming year full of inspiration. I know you'll have so much fun and can't wait to see what the year has in store. Now on to my card!


Today's card was actually a bit of a challenge. I expected it to come together quite easily as I already had a basic concept in my mind of fiery watercolor wisps and golden scales. However, it proved to be more difficult than expected. I started with my watercolor portion of which I used Real Red, Calypso Coral, and Peekaboo Peach Ink Pads to create my "fiery fog" background. That part was simple enough. Even coloring my dragon wasn't a difficult task. The problem came later when assembling my final card, but I won't get ahead of myself.

After the dragon and background dried, took some of the brand new Gold Glitter Flakes and adhered them as swirls and flourishes in the flames. I also thought they would make great "dragon scales" so I added some to my dragon. 


At this point I struggled with my layout. I thought it was bit too simple for my taste, so I decided to add some clouds fot my dragon to sit on out of Gold Glimmer Paper, and that finished off my card. Thanks so much for stopping by and I’ll see you next post! Happy New Year!

Get your friends together and host a party to earn Stampin' rewards during the month of September! Contact me to book an event!

To order online: 
January 2018 Hostess Code:
AKUEKT69


 If you’ve considered joining, it's a truly great time! For just $99, you can select $125 of your choice of product AND earn a 20% discount on purchases from the Annual Catalog.  This is an amazing deal! If you want to join my team, click here or please email me!


INTRODUCING THE STAMPARATUS: A NEW WAY TO STAMP!


It’s big news when something breaks the mold and changes everything. That’s why we were SO excited to introduce the Stamparatus! It is, quite simply, the best tool of its kind on the market today and it will change the way you stamp. In fact, before long you’ll wonder how you crafted without it. 

Why do YOU need one? You’ll fall in love with stamping all over again when you learn everything you can do with it!
  • Make multiples with ease 
  • Consistently stamp crisp, clean images
  • If you want a darker impression, apply more ink and restamp—no need to start over
  • Make fewer mistakes, saving time and money
  • Easily create 2-step, 3-step, and 4-step stamped images using reversible plates
  • Develop new and specialized stamping techniques with adjustable stamping plates and precision placement

I need product details!
  • Compatible with Stampin’ Up!’s red rubber and photopolymer stamp
  • Foam mat to use with photopolymer stamps
  • Rulers and gridlines for quick measuring
  • 2 open sides so you can stamp on larger paper
  • 2 reversible plates: a total of 4 surfaces to work with
  • 2 magnets to hold the paper in place
  • Magnet storage areas
  • Retail Price–$49.00 USD/$65.00 CAD

RESERVE NOW while supplies last. Check out this amazing tool and how it works in the video below. If you have any questions about ordering feel free to contact me @ Craftylittlepeach@gmail.com


#TGIFC336 Color Challenge

   Hey peaches and thanks for joining me for another fun TGIF challenge this week! If you're new to the  TGIF Challen ges , each Friday,...